Apply Template replaces Reset Site to Template in the Actions list.
Overview
You can create and apply a template to all devices in an Account when you need a particular device configuration.
The template that you create is accessible only in your Account. After the template is created, you can apply it to a device. If the firmware version is different between the template and the target device, you can still apply the template, but some settings might not be changed. Only settings that have been modified are changed. The SIM settings are not changed.
Watch a four-minute video about creating and applying templates. In this video you will learn how to create, clone, and apply templates. Note that subtitles are available in English and Hebrew. Click the cogwheel  for options.
GSM Settings
The following GSM settings are not changed when a template is applied:
- gsm_apn
- gsm_apn_pass
- gsm_apn_user
- gsm_copsmode
- gsm_disable
- gsm_done_onetime_setup
- server_addr
- server_port
- server_url
- cdma_activated
- cdma_disable
- comm_disable
- gsm_op_id
- gsm_op_mode
- gsm_op_rat
- preferred_link_type
- cell_fach_enhancements
- use_cmux
- gsm_mqtt_enable
- sim_sel
- gsm_apn_pass_sim2
- gsm_apn_sim2
- gsm_apn_user_sim2
- server_ssl_port
- use_ssl
- mqtt_server_addr
- mqtt_server_port
- gsm_op_id_sim2
- gsm_op_mode_sim2
- gsm_op_rat_sim2
- mqtt_pass
- mqtt_user
- preferred_sim
- home_interval_retry_minutes
- home_interval_calibration_mode_minutes
Note: When the template is applied to the device, its previous data streams are removed and replaced with new data streams. The device's original technical streams, reports, logs, and commands remain.
Note: The templates are compatible with devices sharing identical "Hardware Revision" codes as the template.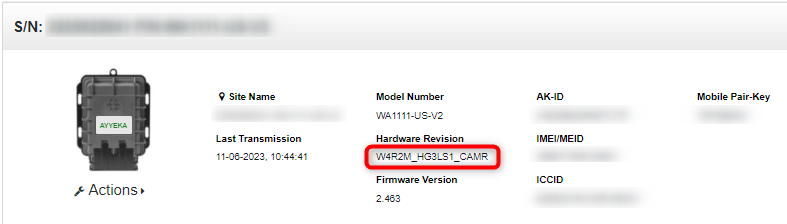
Prerequisites
You must have the correct Account role:
- To create a template, you must have the Owner or Partner role.
- To apply a template to any Account that you can edit, you must have the Administrator, Owner, or Partner role.
To create a template:
- Click Devices in the left pane.
- Go to the site that you want to create a template from.
- Click Actions > Create Template From Site.
- In the Create Template window, select the Account, and then type in a meaningful name for the template. The name might include date and firmware version.
- Click Submit.
- Check that the new template is listed in the Account. Templates are labeled with the yellow icon
 .
.
To apply the template:
- Click Fleet in the left pane. The Devices window opens.
- In the Devices window, choose the target device that you want to apply the template to. If you select multiple devices, check the Firmware column to ensure that their firmware versions are compatible.
- Click Set Action > Apply Template.
- In the Apply Template window, select the template that you want to apply.
You will only see templates that are assigned to you. If the new template is not listed, then the template is not compatible with the target devices in the Site. This case is typically caused by mismatched firmware versions or hardware.
5. Click Next. The template will be checked to be sure that it is compatible with the devices that you selected. Any incompatible settings will be listed as WARNINGS. You can either ignore the warnings or resolve them. If you chose OK to ignore the warnings, those settings are ignored and the remaining settings in the template are applied.
6. Select the Accept check box, and then click Submit. The template is applied to the device. This process might take up to one hour, depending on how often the device transmits.
7. If the template application succeeds, skip this step. Otherwise, do the following steps:
-
- If the Apply Template fails, a message with the cause of failure will be displayed. Click the reason to get details.
- If you are applying the template to multiple target devices, some devices might fail while others succeed. In this case, the status will say “Failed”, even though the template was successfully applied to some target devices. The error message will indicate which device failed and why.
To verify the template:
After you apply the new template to the device, verify that everything works in the lab before taking it to the field.
- Connect the sensor to the device.
- Return to the Ayyeka the UI window. Check that the new data streams are sending data and that the values are what you expect.
Troubleshooting
- Check the target device by doing these steps:
- Click Devices, and then click the site and the device that now has the new template.
- Click the Commands tab to open a table of the latest commands.
- In the Command column, scroll down to see “Set Configuration”. When you initially apply the template to the target device, the Status for “Set Configuration” and for “Reboot” will both be 0% and grayed out.

-
- When Status is 100%, right-click 100% to see how the commands are completed:
- The Sent and Succeed commands should be greater than 0.
- The Failed command should be 0.
e. Click the Configuration tab, and then scroll down to the STREAM MANAGEMENT section. Check that the information in the table is correct.
f. Open the ADVANCED DEVICE CONFIGURATION section, and then open SampleGroup > GROUP. Click the group that the stream belongs to.
g. Click group_active. The value should be 1 or AS_ON, meaning that grouping is active.
2. Check a stream in the target device by doing the following steps:
-
- Click a stream that uses transformation formulas. An example might be Flow, which converts raw sample data to American measurements.
- Click the Configuration tab to check that the configuration formulas are correct.
- Click the Samples tab to check the data in the Raw Value and the Final Value columns.
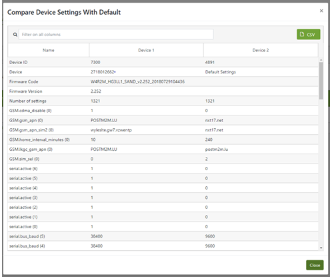
3. Compare the target device with the default settings by doing the following steps:
-
- Click Fleet in the left pane. The Devices window opens.
- Select the target device, and then click the Set Action
- Select Compare Device Settings with Default to compare the target device with the default settings. Check that the target device has the expected settings.