Introduction
Data that is collected from various sensors through data acquisition devices (Industrial IoT gateways/RTUs) is maintained in a cloud database. This data can be accessed via the CSV Generator Agent. The data is written, at a configurable frequency, to a file in a CSV format in the selected directory. The data appears in the CSV file in the order in which the data arrived at the cloud database.
Table of Contents
Installing and running the CSV agent
Step 1: Extract the installation package
Step 2: Define a ZONEINFO System Variable
Step 3: Customize the csvagent.json configuration file
Configuration file description
Adding values of custom attributes to the CSV file
Step 4: Install and run the CSV agent
Running CSV Agent CLI commands
Appendix A – Agent Heartbeat Functionality (Troubleshooting)
Default csvmonitor configuration file
csvmonitor configuration file description
Setting the frequency of agent-monitoring file creation
Example agent-monitoring output file
Appendix B - FAQ about the CSV Agent
Prerequisites
Use either operating system:
- Microsoft Windows Server 2012 or Windows 10
- Linux (not recommended) - can run CSVCLI only, with a Windows emulator or runtime environment such as "Wine"
- CSV Agent installation compressed file (CSVAgent-v<version number>.zip)
- You must have an Account/Organization Owner role or an Account/Organization Administrator role to generate the API Client Key and the API Client Secret.
You must not generate the REST API keys when logged in as a user with the Partner role.
For an on-premises system, you must not generate the REST API keys when logged in as the (super) Admin user. The keys generated by the Admin user will not work.
Installing and running the CSV agent
The CSV Agent is available from the API screen of the the UI UI (API > Agents > CSV Agent Download).
When you click the CSV Agent Download button, a new API Client Key and API Client Secret are automatically generated, which can be verified on the API > API Clients screen. These credentials are appended to the csvagent.json configuration file, which is then bundled together with the other CSV Agent files as the installation package, into a zip file, which is downloaded to your computer.
Step 1: Extract the installation package
Extract the downloaded installation package into a folder. The installation package contains the following files:
- csvcli.exe
- csvagent.exe
- csvagent.json
- zoneinfo.zip
Step 2: Define a ZONEINFO System Variable
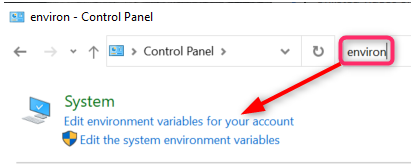
If the operating system is Microsoft Windows, define a ZONEINFO Windows system variable. Do the following steps:
- In the task bar on your Desktop, go to Search field and type in Control Panel.

3. In the System variables pane, click New. The Environment Variables window opens.
4. In the User variables pane of the Environment Variables window, do the following steps:
-
- Click New to add a new variable.
- In the Variable Name field, enter ZONEINFO.
- In the Variable Value field, enter the full path and file name to the zoneinfo.zip file supplied in the installation package.
- Click OK.
Step 3: Customize the csvagent.json configuration file
The configuration file contains key information about how the content in the CSV file will be handled:
- The initial section contains information about API access and authentication.
- The Agent section contains information about the CSV Agent's behavior: from how long ago to pull data, polling, frequency, and metadata refresh rate.
- The CSV Format section contains information about the header, the content (what sampling data is included and in what order), and the format for the datetime stamp. Data can include sampling data and metadata (including custom attributes) from the Site level or from the stream level.
- The Output section contains information about the directory path, CSV file name, the datetime format for the file name, and whether to use local or UTC time.
Customize the configuration file by doing the following steps:
- Open the csvagent.json configuration file in a text editor.
- Change the parameter values as described in Table 1 below. If you use Ayyeka On Premises rather than Ayyeka on Cloud, you must change the default values for APIEndpoint and AuthEndpoint parameters.
Note:
Changes to the csvagent.json configuration file go into effect only after starting or restarting the CSVAgent service. If you want to change the configuration file after the CSV agent service is already running, first stop the service, edit the configuration file, and then restart the service.
Configuration file description
Table 1: CSV Agent configuration file parameters:
|
Parameter |
Description |
Default value |
|
|
Initial section |
|||
|
APIEndpoint |
The URL of a server or service from which APIs can access the resources they need to carry out their function.
The place that APIs send requests to and where the resource lives. |
https://restapi.ayyeka.com If you use Ayyeka On Premises rather than Ayyeka on Cloud, use: "http://your_URL:85/v2.0" or if your on-premises server is configured for SSL, then use: "https://your_URL:85/v2.0". |
|
|
AuthEndpoint |
The URL from which the Authorization API can manage user identity so that users can log in, sign up, log out, access APIs, and so forth.
|
https://restapi.ayyeka.com/auth/token If you use Ayyeka On Premises rather than Ayyeka on Cloud, use: "http://your_URL:85/auth/token" or if your on-premises server is configured for SSL, then use: "https://your_URL:85/auth/token" |
|
|
APIClientKey (required) |
API Key is automatically put into the APIClientKey field of the configuration file when you click the CSV Agent Download button. |
|
|
|
APIClientSecret (required) |
API Secret is automatically put into the APIClientSecret field of the configuration file when you click the CSV Agent Download button. |
|
|
|
Agent section |
|||
|
InitialBackfilling |
Specifies to send data from this many days ago. This parameter applies only to the first time you run the CSV generator agent. If you want to back fill at any later point, use the CLI command setlast. |
7 |
|
|
SamplesPolling |
Specifies how often, in minutes, to pull polling data that accrued since the last time data was pulled, and then send in a CSV file For example, if the value is 3, then every 3 minutes the agent pulls from the Ayyeka database all the polling data that accrued in the past 3 minutes. The agent sends it in a CSV file. |
1 |
|
|
MetadataPolling |
Specifies how often, in minutes, to refresh the list of metadata fields from which data is pulled. The metadata fields are all fields except for sample.datetime, sample.value, and sample.id For example, if a new device is installed (meaning, a new SiteID now exists in the database), this parameter defines when the CSV file will start including sample data from the new device. |
720 |
|
|
CSVFormat section |
|||
|
Header |
Specifies from 0 to many lines of text that appear at the top of each CSV file. Typically there is a single row with column headings, separated by commas, for each data item in the data rows (referred to as "Line" below). |
SiteID,StreamID, |
|
|
Each row, listing the sample's attributes separated by commas, corresponds to a single polled sample. It defines which values that are associated with the sample should appear in the CSV file. For example: the sample’s attribute SiteID is replaced in the CSV file with the actual ID of the site associated with the sample. Note that you can also add values of custom attributes, as described in Adding values of custom attributes to the CSV file. |
SiteID,StreamID, site.displayname, stream.displayname, sample.datetime,sample.value, sample.id
|
||
|
DateTime |
Specifies the format of the DateTime in DateTime fields appearing in a line. |
MM/DD/YY hh:mm:ss |
|
|
TimeZone |
Specifies the international time zone to which all timestamps are converted. The value for this property can either be "Local" (which indicates the time zone of the computer that is hosting the CSV Agent), or any valid international time zone that is referenced in the zoneinfo.zip file (configured in Step 2 above), such as "Asia/Jerusalem". |
Local | |
|
Output section |
|||
|
Dir |
Specifies the directory in which the CSV files should be placed. |
c:\temp\csv |
|
|
Specifies the naming convention of the CSV files. By default, the DateTime parameter below is used in the file name. |
Ayyeka_import_ DateTime.csv
|
||
|
DateTime |
Specifies the format of the DateTime in the CSV file name. Note that the DateTime format should match the frequency with which the CSV files are created. That is, if a CSV file is created every minute, then the DataTime in the CSV file name should include minutes (if not seconds). |
"MM-DD-YY__hh-mm-ss" |
|
|
Filters section (optional) |
|||
|
partition (optional) example:
|
|
||
|
Refer to Creating a filtered CSV file. |
|
||

Configuration file example
The following JSON code is an example of a csvagent configuration file for an Ayyeka on Cloud account.
{

    "APIEndpoint": "https://restapi.ayyeka.com/v2.0",

    "AuthEndpoint": "https://restapi.ayyeka.com/auth/token",

    "APIClientKey": "C69748D7A94648CE835076050CB87511",
    "APIClientSecret": "VnH3rfHLbl9tKoF0jHIq7D2EJP53vlrpHxzK+7YPe911",
    "LogDir": "c:\\temp\\logs",

    "Agent": {

        "InitialBackfillingSamplesDays": 7,

        "SamplesPollingIntervalMinutes": 1,

        "MetadataPollingIntervalMinutes": 720

    },

    "CSVFormat": {

        "Header": "SiteID,StreamID,SiteName,StreamName,TimeStamp,Value,ID",

        "Line" :"28862,,,,,,",

        "DateTime": "MM/DD/YY hh:mm:ss"

"TimeZone": "America/Lima"

    },

   "Output" : {

        "Dir": "c:\\temp\\csv",

        "FileName": "_Ayyeka_import_.csv",

        "DateTime": "MM-DD-YY__hh-mm-ss"

 }

    "Filters": [

    ]

}
Adding values of custom attributes to the CSV file
In the Ayyeka UI, you can define multiple custom attributes for each Site, and multiple custom attributes for each data stream. Each custom attribute has a name and a value. For example, a Site's custom attribute might be called address whose value is Madison 122. A stream's custom attribute might be model and its value is Digital.
After creating custom attributes in the UI, you can add their values to the CSV file by adding those custom attributes to Line in the CSVFormat section of the csvagent configuration file.
In our example, the syntax for the Site's custom attribute would be site.custom.address, which will be replaced with Madison 122 in the CSV file. Similarly, the syntax for the stream's custom attribute would be stream.custom.model, which will be replaced with Digital in the CSV file.
Filtering the data that is downloaded by the CSV Agent
By default, the CSV Agent will download all samples from all streams from all sites, to which the CSV Agent "user" has access. Therefore, it is recommended to add the optional “Filters” section to the csvagent.json configuration file, so you can exclude any sample data that you do not need.
You can define multiple filtering rules. Each rule is defined by applying a regular expression to the value of a sample’s attribute (see Regular Expression Language - Quick Reference for the syntax of the regular expressions).
Example 1:
The following code is an example of a “Filters” section:
"Filters": [
        {"Var": "sample.value", "Regex": "[\d]{2}(.+?)"},
        {"Var": "stream.custom.address", "Regex": ".+"},
        {"Var": "site.custom.sewershed", "Regex": "R2D2\.R2_(.+?)"}
    ]
In the example, the first filtering rule specifies to download only samples whose values are two-digit numbers (for example, if the values are temperature readings, and you only wish to receive samples whose temperature readings are 10 degrees and above).
The second filtering rule specifies to download only samples whose custom attribute address is non-empty.
The third filtering rule specifies to show only samples whose custom attribute sewershed contains the prefix R2D2.R2.
Example 2:
Every Account is automatically configured with custom attributes. The custom attribute for every Site in the Account is "SiteName". The custom attribute for every stream in the Account is "StreamType".
When editing a Site or stream in the the UI UI, you can populate the custom attribute with any value, just like you can change the name of the Site. Both the Site Name and the Custom Attribute values for the Site and the stream are user-defined.
In the following example, the CSV Agent will only download data from Sites whose custom attribute is Northern Region. Similarly, the CSV Agent will only download data from streams whose custom attribute is Flow.
"Filters": [
     {"Var" : "site.custom.SiteName", "Regex" : "Northern Region"},
     {"Var" : "stream.custom.StreamType", "Regex" : "Flow"}
]
In the following example, the CSV Agent will download data from any Site that has any value in the SiteName custom attribute, and only streams that have the StreamType custom attribute populated with any value.
"Filters": [
     {"Var" : "site.custom.SiteName", "Regex" : ".+"},
     {"Var" : "stream.custom.StreamType", "Regex" : ".+"}
]
Step 4: Install and run the CSV agent
-
Open a command line window (Windows or Linux). If you are using a Windows operating system, you must run as Administrator.
-
Navigate to the csvagent installation package.
-
Run: csvagent.exe service --install
-
The CSV agent is installed with the settings you configured in Step 3.
-
Run: csvagent.exe service --start
The CSV agent is launched.
The default location of the log file is C:/temp/logs/.
Stopping the CSV agent
-
Open a command line window (Windows or Linux)
-
Navigate to the csvagent installation package.
-
Run: csvagent.exe service --stop
Restarting the CSV agent
-
Open a command line window (Windows or Linux).
-
Navigate to the csvagent installation package.
-
Run: csvagent.exe service --start
Uninstalling the CSV agent
-
Open a command line window (Windows or Linux).
-
Navigate to the csvagent installation package.
-
Run: csvagent.exe service --uninstall
Using the CSV Agent CLI
You can use the CSV Agent CLI to interact with the CSV agent. The CLI provides the following options:
-
site – Retrieve samples from a specific site and from a specific date.
-
stream – Retrieve samples from a specific stream and from a specific date
-
getlast – Retrieve the last provided sample in the last provided CSV file.
-
setlast – Retrieve samples from a specific date onward, or from a specific sample ID
-
export – Export metadata of sites or streams into a CSV file
-
import– Import metadata of sites or streams from a CSV file
-
Help – Display the list of csvcli commands
-
Version – Display the CSV Agent version
Using the CSV Agent CLI
-
Open a command line window (Windows or Linux).
-
Navigate to the csvagent installation package.
-
Run a CLI command, as described in Running CSV Agent CLI commands.
-
Note that you can specify, for each CLI command, to receive additional debug information, by adding -verbose before the command name. For example: csvcli.exe -verbose site [command options]
Running CSV Agent CLI commands
site
Description: Retrieve samples for the specific site from the specified date.
Usage: csvcli.exe site [command options]
Options:
-d UTC DATE of the oldest sample in format "YYYY-MM-DD hh:mm:ss" (Mandatory)
-i The site ID (Mandatory)
-o The output file name (Mandatory)
-h Show command help (Optional)
Sample usage:
csvcli.exe site -i 3582 -d "2018-01-31 00:00:00" -o sitetest.csv
stream
Description: Retrieve samples for the specific stream from the specified date.
Usage: csvcli.exe stream [command options]
Options:
-d UTC DATE of the oldest sample in format "YYYY-MM-DD hh:mm:ss" (Mandatory)
-i The stream ID (Mandatory)
-o The output file name (Mandatory)
-h Show command help (Optional)
Sample usage:
csvcli.exe stream -i 3582 -d "2018-01-31 00:00:00" -o streamtest.csv
getlast
Description: Retrieve the last provided sample in the last provided CSV file.
Usage: csvcli.exe getlast [command options]
Options:
-h Show command help (Optional)
Sample usage:
csvcli.exe getlast
setlast
Description: Retrieve samples from a specific date onward, or from a specific sample ID
Usage: csvcli.exe setlast [command options]
Options:
-d UTC date of the last delivered sample in format "YYYY-MM-DD hh:mm:ss" (Either –d or –i is Mandatory)
-i The sample ID of the sample from which to start delivering sample data (Either –d or –i is Mandatory)
-h Show command help (Optional)
Sample usage:
csvcli.exe setlast -i 1111111
csvcli.exe setlast -d "2018-03-19 08:52:38"
export
Description:
Export all metadata of sites or streams into a CSV file. The output CSV file include all the Site or streams to which the user, running the command, has permissions.
After running the export command, you can edit the output CSV file and then import it into the Ayyeka Server, for batch configuration of sites’ or streams’ custom attribute values.
Structure of Export-Sites CSV file:
If you are exporting sites metadata, the first (header) line in the output CSV file is as follows, where ID is the Site ID:
ID,SiteDisplayName,OrganizationName,<customAttr.1>,<customAttr2>,<…>
The following is an example of the output for a sites:
ID,SiteDisplayName,OrganizationName,tag1,tag2
136,MadisonAve,WaterWorks,123,
137,ParkAve,SewageInc,,abc
138,MainAve,GasInc,,
Structure of Export-Streams CSV file:
If you are exporting streams metadata, the first line in the output CSV file is as follows, where ID is the Stream ID:
ID,SiteDisplayName,OrganizationName,StreamDisplayName,<customAttr.1>,<customAttr2>,<…>
The following is an example of a streams output CSV file:
ID,SiteDisplayName,OrganizationName,StreamDisplayName,tagA,tagB
1221,MadisonAve,WaterWorks,Acidity,123,
1222,ParkAve,SewageInc,Level,,abc
1223,MainAve,GasInc,GPS,,
Usage: csvcli.exe export [command options]
Options:
-t site|stream Export metadata regarding sites or export metadata regarding streams (Mandatory)
-o The output file name (Mandatory)
-h Show command help (Optional)
Sample usage:
csvcli.exe export –t site –o sitesList.csv
csvcli.exe export –t stream–o streamsList.csv
import
Import a CSV file with metadata regarding sites or streams, into the Ayyeka server. This command is useful for creating or updating values of custom attributes, provided these attributes are already defined in the Ayyeka UI (that is, the attributes already exist in the Ayyeka database).
The sites or streams in the import CSV file must only include sites or streams to which the user, running the command, has permissions.
The structure of the Import CSV file is described in Structure of Import-Sites CSV file and Structure of Import-Streams CSV file below. Note that you cannot change the format or content of the CSV file other than the custom attribute columns.
For each custom attribute whose values you wish to create/update, you must include the attribute name in the first (header) line of the CSV file, as well as a representation (that is, a comma, preceded by a value, if needed) in each of the rest of the lines.
If you are basing the import CSV file on a CSV file obtained through the export command, you can delete an entire column representing a certain custom attribute (by deleting it in each of the lines, including the header). However, for any custom attribute column you choose to leave or include in the CSV file, if a value already exists for the attribute, you can only edit the attribute value – you cannot delete the value altogether (attribute values must be deleted in the Ayyeka UI).
Structure of Import-Sites CSV file
If you are importing sites metadata, the CSV file must have the following format (where ID is the Site ID):
ID,SiteDisplayName,OrganizationName,<customAttr.1>,<customAttr2>,<…>
The following is an example of an import sites CSV file:
ID,SiteDisplayName,OrganizationName,tag1,tag2
136,MadisonAve,WaterWorks,123,abc
137,ParkAve,SewageInc,345,def
138,MainAve,GasInc,789,ghi
Structure of Import-Streams CSV file
If you are importing streams metadata, the CSV file must have the following format (where ID is the Stream ID):
ID,SiteDisplayName,OrganizationName,StreamDisplayName,<customAttr.1>,<customAttr2>,<…>
The following is an example of an import streams CSV file:
ID,SiteDisplayName,OrganizationName,StreamDisplayName,tagA,tagB
1221,MadisonAve,WaterWorks,Acidity,321,cba
1222,ParkAve,SewageInc,Level,654,fed
1223,MainAve,GasInc,GPS,987,ihg
Usage: csvcli.exe import [command options]
Options:
-t site|stream Import metadata regarding sites or import metadata regarding streams (Mandatory)
-i The import file name (Mandatory)
-h Show command help (Optional)
Sample usage:
csvcli.exe import –t site –i sitesList.csv
csvcli.exe import –t stream –i streamsList.csv
Appendix A – Agent Heartbeat Functionality (Troubleshooting)
During periods when the SCADA system receives no samples from the CSV agent, there is no way of knowing whether samples are not received because there are no new samples, or a connectivity problem occurred, or the CSV agent is not running, or the SCADA malfunctioned or is badly configured. The CSV agent heartbeat functionality addresses this issue by creating agent-monitoring CSV files that provide agent status data (and additional data if needed). The SCADA system can use tags to pull information from the agent-monitoring CSV files, just like it uses tags to pull stream data from the site CSV files.
The agent heartbeat mechanism can measure and report on the following:
- Connection – the state of the connection between the CSV agent and the Ayyeka server
- DiskSize – the amount of free disk space on the machine hosting the CSV samples files. This provides information on whether disk storage space is running out.
- RunTime – the CSV agent’s runtime
You can create a csvmonitor.json configuration file that defines the format and content of the agent-monitoring CSV files, as well as the location where they are placed.
In a text editor, create a csvmonitor.json configuration file as described below. For details about the parameters, see Table 2.
Default csvmonitor configuration file
The default configuration of the csvmonitor.json file is as follows:
{
    "MonitorIntervalSeconds": 60,

    "Units":{

        "Connection": {

            "SkipInactive": 1,

            "Value": "  "
        },
        "DiskSize": {

            "Disabled": 1,

            "DiskName": "c:",

            "ThresholdPercentage": 80,

            "Value": "       "
        },

        "RunTime": {

            "SkipRepeat": 1,

            "UptimeFormat": "ss",

            "DateTimeFormat": "MM/DD/YY hh:mm:ss",

            "Value": " "
        }
    },

    "CSVFormat": {

        "Header": "MeasurementName,UnitName,TimeStamp,Value",

        "Line" :",,,",

        "DateTime": "MM/DD/YYYY hh:mm:ss",

        "TimeZone": "Local"
    },

    "Output" : {

        "Dir": "c:\Ayyeka\csv\dumps",

        "FileName": "monitor.csv",

        "DateTime": "MM-DD-YY__hh-mm-ss"
    }
}
csvmonitor configuration file description
Table 2: CSV Agent Monitoring – configuration file parameters
|
Parameter |
Description |
Default value |
|
Specifies how often, in seconds, to monitor the status of the CSV agent. |
60 |
|
|
Units section |
||
|
Connection sub-section – reports information about the state of the connection between the CSV agent and the Ayyeka server |
||
|
SkipInactive |
Specifies whether to include in the output agent-monitoring file, Connection Value (see next row in this table) lines whose is 0 (indicating that the CSV agent is not connected to the Ayyeka server).
|
1 |
|
Specifies the state of the connection using a combination of free text and any of the following optional variables:
|
" " |
|
|
DiskSize sub-section – reports information about the amount of free disk space on the machine hosting the CSV samples files |
||
|
Disabled |
Specifies whether to disable the DiskSize test.
|
1 |
|
DiskName |
Specifies for which hard disks to report disk size. Use a comma-separated list to specify multiple hard disks. For example: “c:”,”d”:,”e;” |
“c:” |
|
ThresholdPercentage |
Specifies for which storage level to display disk size notification.
|
80 |
|
Value |
Specifies the free disk space using a combination of free text and any of the following optional variables:
|
" |
|
RunTime sub-section – reports information about the CSV agent’s runtime |
||
|
SkipRepeat |
Specifies whether to display runtime if its values haven’t changed since the last time runtime was reported. Note that this is affected by the resolution you set in UptimeFormat.
|
1 |
|
Specifies the resolution, or granularity, at which to report runtime. For example, if you specify mm, then runtime is reported at a resolution of minutes. |
"ss" |
|
|
DateTimeFormat |
Specifies the datetime format to use when reporting the runtime. You can specify any format that complies with the ISO 8601 standard. |
"MM/DD/YY hh:mm:ss" |
|
Value |
Specifies the runtime state using a combination of free text and any of the following optional variables:
|
" " |
|
CSVFormat section |
||
|
Header |
Specifies the multiline string appearing at the top of the output agent-monitoring file. |
"MeasurementName, |
|
Line |
Specifies the contents of each line in the agent-monitoring file (that is, it specifies the columns appearing in the output file), using a comma-separated list composed of any of the following optional variables:
|
",, |
|
DateTime |
Specifies the format of the datetime in the datetime fields appearing in a line. You can specify any format that complies with the ISO 8601 standard. |
"MM/DD/YY hh:mm:ss" |
|
TimeZone |
Specifies in which timezone to display the datetime.
Note that the TimeZone setting applies also to the datetime in the CSV file name, if the naming convention you define in FileName includes a datetime. |
"Local" |
|
Output section |
||
|
Dir |
Specifies the directory in which the agent-monitoring files should be placed. |
"c:\Ayyeka\csv\dumps" |
|
FileName |
Specifies the naming convention of the agent-monitoring files using a combination of free text and the following optional variable:
Note that this definition determines the frequency at which the output agent-monitoring files are created, as explained in Setting the frequency of agent-monitoring file creation. |
"Monitor.csv" |
|
DateTime |
Specifies the format of the datetime in the agent-monitoring file name. You can specify any format that complies with the ISO 8601 standard. |
"MM-DD-YY__hh-mm-ss" |
Setting the frequency of agent-monitoring file creation
The definition of FileName in the csvmonitor.json file, determines whether all measurements are reported in the same agent-monitoring output file, or whether multiple monitoring files are created, and at what frequency.
- If the definition of FileName does not include a datetime variable, then the results of each new measurement are appended to the end of the single agent-monitoring file.
- If the definition of FileName includes a datetime variable, then new monitor files are created accordingly. For example, if the granularity of the datetime is in hours, then a new monitor file is created every hour (and if, further, the MonitorIntervalSeconds is 120 (seconds), then each monitor file contains data from 30 measurements).
A typical definition of FileName is: "monitor_.csv"
Example agent-monitoring output file
The following is an example of an agent-monitoring output file.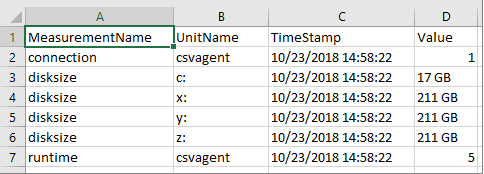
Appendix B - FAQ about the CSV Agent
Q: What is the maximum number of samples that the Agent saves in a CSV file?
A: 10,000 samples
Q: Does the Agent include all relevant data from the current data retrieval session?
A: All data that was retrieved and passed through filtering and partitioning will be added to a file. A file will not be split based on its length, processing time, and so forth.
Q: How long is a session? Would a session be as long as it takes to retrieve the recent data even if there is a need to backfill from several days before?
A: Session length depends on several factors such as network connection, server load, current performance, and so forth. These factors are in constant flux.
If there are many samples in the server database, the agent will ask once, fetch 10K samples, store them into a new CSV file, repeat the fetch-store process until all samples are fetched from the server, and then wait the configured time.
Q: If there is no new data on the server because the device did not transmit during the set time interval, does the Agent wait to create a new file at the next transmission of new data?
A: In general, if there is no new data on the server, no new files will be created.
If there is a splitBy by site, and some sites have new data while others don't, files will be created only for the sites that have data.
Q: If the transmission interval is 12 hours, will the CSV Agent only create files every 12 hours when new data arrives? Will the CSV files contain all 12 hours' worth of sample data, or will the data be spread out among several smaller files?
A: The Agent will pull 10K of sample data.
If that's the entire data, then all data will be in the same file. If not, then the next time the Agent pulls data, a new file will be created. Note that even though the second pull of data is from the original transmission, the new file is not appended to the first.