Ayyeka provides an REST API Interface that can be used to monitor and manage devices. In order to use REST API your user must be in either one of this permission groups: account or organization owners or administrators.
Table of Contents
1. Create an API client for the application
2. Get an Access Token for a REST API Call
3. Authenticate with REST API by using the Access Token
Testing your REST API Commands by Using Postman REST Client
Terminology
|
Terminology |
Definition |
| Authentication Server | Entity that protects data and validates credentials before authorizing an API Client to take any action on behalf of an end user. |
| API Client | Entity that represents your application and allows use of OAuth2.0 for authentication. |
| Client Credentials | API key and secret for the API Client. |
| Access Token | Token provided by the Authorization Server to the client application to authorize access to data. |
| grant_type | This must be client_credentials. |
| client_id | Your application's API Client Key. |
| client_secret | Your application's API Client Secret. |
Overview
Ayyeka uses OAuth 2.0 for authentication. After generating an API Client Key and Secret in the UI, submit them to the authentication server to obtain a temporary access token.
- Access Token: Grants access to Ayyeka Cloud or on-premise data for 60 minutes.
- API Client Key/Secret: Valid indefinitely.
- Include the access token in the header of all REST API calls. When the token expires, generate a new one and use it for subsequent calls.
Ayyeka recommends using the Postman platform to test and understand API methods, including the authentication process, before implementing them in your environment.
Authorization Protocol
When a user calls an API function, the system checks their permissions to determine which devices they can manage and whether they are authorized to perform the action.
Ayyeka uses the OAuth 2.0 protocol to securely authorize API client access without sharing your username or password. You can view or revoke authorized API clients in your account settings.
Only the client credentials grant type is supported. For details, see The OAuth 2.0 Authorization Framework.
Prerequisites
1. Basic Knowledge:
- Familiarity with software development, REST APIs, and the UI is required.
2. Postman Testing:
- Download and install Postman to test your REST APIs.
3. Permissions:
- Only Account/Organization Owners or Administrators can generate the API Client Key and Secret.
- Do not generate keys while logged in with the Partner role.
- For on-premise systems, do not generate keys as the Admin user; these keys will not work.
4. Swagger Testing: Download and install Swagger if you plan to use it to run your APIs.
5. Account-Specific Keys: Generate separate API Client Keys and Secrets for each Account if running commands in multiple Accounts.
6. Server Type:
- Use different URLs for the REST API Domain and Authentication Server if your data is stored on an on-premise server instead of Ayyeka Cloud.
- Refer to the URL table below for correct endpoints.
Set up the REST API
1. Create an API Client for the application
-
-
Get the API Client Key and Secret by doing the following steps in the UI:
-
i. In the left pane, click API, and then click the API Clients tab.
ii. In the API Clients window, click +Generate API Key.
iii. In the Generate API Key window, select REST, type in a comment, and then click Generate.
Important: Save the API Client Key and Secret securely, as the Secret cannot be retrieved later.
2. Get an Access Token for REST API Calls
To make a REST API call, include the required headers, particularly the Authorization header with an OAuth 2.0 Access Token.
To obtain an Access Token:
- Encode
[API_Client_Key]:[API_Secret]in Base64 format. - Pass it in the Authorization header of a request to the Authentication Server URL.
Use the Access Token in the Authorization header for all API calls.
    +---------+                                  +---------------+
    :         :                                  :               :
    :         :>-- A - Client Authentication --->: Authorization :
    : Client  :                                  :     Server    :
    :         :<-- B ---- Access Token ---------<:               :
    :         :                                  :               :
    +---------+                                  +---------------+
Example request:
POST /auth/token HTTP/1.1
Host: https://restapi.ayyeka.com/auth/token
Content-Type: application/x-www-form-urlencoded
Authorization: Basic MTQ5RjlBQzY4OUNCNEYxNjg1MzQzM0FBMEFFNDRFNUY6ZVBzNEczNT
JCVUQ5RllDdlBYRW96MlJDNVVZeC9LOEJvVnMrbWtyVmZwZz0=
Cache-Control: no-cache
grant_type= client_credentials
Example response:
HTTP/1.1 200 OK
Cache-Control: no-store
Content-Type: application/json; charset=utf-8
Date: Mon, 26 Jun 2017 14:36:08 GMT
Pragma: no-cache
Content-Length: 231
Connection: keep-alive
{"access_token":"eyJhbGciOiJIUzI1NiIsInR5cCI6Ikp
XVCJ9.eyJhdWQiOiIyIiwiZXhwIjoxNDk4NDkxMzY4LCJpYXQiOjE0OTg0ODc3NjgsImlzcy
I6IkNsb3VkIiwic3ViIjoiMjc...",
    "token_type":"JWT","expires_in":3600}
Example using curl (How to complete the authentication process):
curl -X POST https://restapi.ayyeka.com/auth/token \
-H 'Authorization: Basic MTQ5RjlBQzY4OUNCNEYxNjg1MzQzM0FBMEFFNDRFNUY6ZVBzNEczNT
JCVUQ5RllDdlBYRW96MlJDNVVZeC9LOEJvVnMrbWtyVmZwZz0=' \
-H 'Cache-Control: no-cache' \
-H 'Content-Type: application/x-www-form-urlencoded' \
-H 'Postman-Token: b0ee4f16-ac32-4429-b1e1-c39ee4793444' \
-H 'cache-control: no-cache' \
-d 'grant_type=client_credentials'
3. Authenticate with the Access Token
With the Access Token from the authorization response, the API client can access the REST API on behalf of the user.
Key points:
- Include the header:
Authorization: Bearer [token]. - Handle
403 Forbiddenerrors, which may indicate the token expired or access was revoked.
The number of Authorization requests is limited to 15 requests per 15 minutes per key. If you exceed the limit, a warning message is displayed.
Tip: To prevent hitting the limit, authorize only when the Access Token has expired rather than on every request. Excess token requests have a negative impact on server performance.
Example request:
GET /v1.0/site HTTP/1.1
Host: <Authentication Server URL>
Authorization:Bearer
eyJhbGciOiJIUzI1NiIsInR5cCI6IkpXVCJ9.eyJhdWQiOiIyIiwi
ZXhwIjoxNDk4NDkxMzY4LCJpYXQiOjE0OTg0ODc3NjgsImlzcyI6IkNsb3VkIiwic3ViIjoiMjc...
Cache-Control: no-cache
Note that the Authorization:Bearer value is the "access_token" from the previous example response.
Example response:
HTTP/1.1 200 OK
Content-Type: application/json;charset=UTF-8
[{"id":1,"creationDate":"2013-05-31T01:11:41Z","displayName":"Test
Site","status":"Active","accountOrganizationId":2}]
Use the REST API Commands
In the UI, click API in the left pane , and then select API Documentation > API Reference (v2.0 or v1.0). A list of all REST APIs is documented.
You can work with the APIs in Swagger. Swagger UI enables you to visualize and interact with the API’s resources without having any of the implementation logic in place. In the UI, click the Download a Swagger file link to download the Swagger yaml file to your local environment. Import the yaml file into Swagger.
Note:
- The limit for data requests is 1 million requests within 15 minutes.
- If you have the Partner role, some API calls might not return any results.
Date-time Format
The date-time format is yyyy:mm:ddThh:mm:ssZ. For example, 2015-10-13T18:23:52Z.
The “T” separates the date from the time. The “Z” means "zero-hour offset", or also "Zulu time" (UTC).
Limited Results
Some REST API calls limit the number of results that they will retrieve at a time.
If the query name contains the string "Batch", then the first line of output will be “hasMore: true”. For example, you are testing the call sampleGetSamplesScalarBatchBySite in Postman, and you see the following output: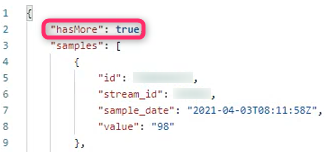
To get subsequent results, run sampleGetSamplesScalarBatchBySite as many times as needed to get all of the results.
Tip: If the query output is too large for a single call, then either narrow your search parameters or contact support@ayyeka.com.
HTTP Status Codes
|
Status Code |
Text |
Description |
|
200 |
OK |
The API command was completed successfully. |
|
304 |
Not Modified |
There was no new data to return. |
|
400 |
Bad Request
|
The request was invalid or cannot be otherwise served. In API v1.1, requests without authentication are not considered valid and give this response. |
|
401 |
Unauthorized |
Authentication credentials were missing or incorrect. |
|
403 |
Forbidden |
The request was refused, or access was denied. |
|
404 |
Not Found |
The URI requested is not valid or the resource requested, for example, a user, does not exist. |
|
406 |
Not Acceptable |
Returned by the Search API when a format that is not valid is specified in the request. |
|
429 |
Too Many Requests |
The request cannot be served because the limit for the resources is exceeded. |
|
500 |
Internal Server Error
|
The requested format is not supported by the requested method, or a runtime error has occurred. The log files SystemOut.log, SystemError.log, and igc.log contain more information. |
|
502 |
Bad Gateway |
The server encountered a temporary error and could not complete the request. Usually, this is a temporary problem. |
|
503 |
Service Unavailable |
The server is up, but it is overloaded with requests. Try again later. |
Testing REST API Commands with Postman
Use Postman to test your API calls before implementing them.
Prerequisites
- Download and install Postman.
- Obtain your API Client Key and Secret.
- For more details:
Steps to Test REST API Commands
1. Generate an API Key
- Create the API Client Key and Secret in the UI. These credentials will be required in the next steps.
2. Set Up OAuth 2.0 for Authorization
-
Open Postman and go to the Authorization tab.
-
In the TYPE dropdown, select OAuth 2.0.
-
Click Get New Access Token, then complete the following fields in the window:
- Token Name: Any descriptive name.
- Grant Type: Select Client Credentials.
- Access Token URL: Enter the
<Authentication Server URL>. - Client ID: Enter your API Client Key.
- Client Secret: Enter your API Client Secret.
- Scope: Leave blank unless specified.
- Client Authentication: Keep the default setting.
-
Click Request Token to generate an Access Token. Copy the token for later use.
-
Important: Repeat this step to generate a new token when it expires (using the same Key and Secret).
3. Use the Access Token in REST API Calls
- If the Use Token button is enabled, click it to apply the token to subsequent calls.
- If not, manually add the token to the header:
- Go to the Headers tab in Postman.
- Add a key
Authorizationand valueBearer [Access Token](ensure a space after "Bearer").
4. Refer to API Documentation
- In the UI, navigate to API > API Documentation > API Reference v2.0.
- Select the desired REST API call for querying Account, Site, Device, Channel, Stream, or Sample data.
5. Prepare API Calls in Postman
- Copy the relevant URL from the API Documentation.
- Replace placeholders (e.g., device ID, serial number, account ID) with actual values.
- Choose the correct HTTP method (e.g., GET, POST) as specified in the documentation.
6. Submit the Request
- Enter the URL in Postman and click Send.
- View the server's response in the Body tab on the right panel.
Example of a Common API Request
How can I retrieve data sampling for a specific stream of a device from the last 4 hours?
Use the API to fetch sample aggregation for a specific stream and date range.
Steps:
-
Locate the API Method:
- Open the API Documentation in the UI.
- Refer to the API METHODS – SAMPLE section.
- Use the API method:
sampleGetSamplesScalarAggregationByStreamAndDateRange.
-
Build the API Command:
- Base URL:
https://<your API domain>/v2.0/stream/{streamId}/sample/agg?timeFrame=&fromDate=&toDate=
- Base URL:
-
Gather Required Values:
- streamId: Identify the stream ID from the Unique Identification table. For example:
123456. - fromDate/toDate: Use Epoch Unix format for the desired time range.
- Example:
fromDatefor2021-09-27T06:00:00Z:1630983600.toDatefor2021-09-27T10:00:00Z:1630998000.
- Example:
- timeFrame: The number of hours to aggregate. Example:
4.
- streamId: Identify the stream ID from the Unique Identification table. For example:
-
Complete Example API Command:
https://my_domain.com/v2.0/stream/123456/sample/agg?timeFrame=4&fromDate=1630983600&toDate=1630998000
This command fetches aggregated samples from stream 123456 for the specified 4-hour period.
2. Test the command in Postman. The output might be:
{

"stream_id": 123456,

"start_date": "2021-09-27T06:00:00Z",

"number_of_samples": 53,

"agg_values": {

"min": "0.384000",

"max": "0.385500",

"avg": "0.384321",

"sum": "20.369000"

}

},

{

"stream_id": 123456,

"start_date": "2021-09-27T07:00:00Z",

"number_of_samples": 3,

"agg_values": {

"min": "0.384300",

"max": "0.384500",

"avg": "0.384400",

"sum": "1.153200"

}

},

{

"stream_id": 123456,

"start_date": "2021-09-27T09:00:00Z",

"number_of_samples": 28,

"agg_values": {

"min": "0.384400",

"max": "0.981300",

"avg": "0.809361",

"sum": "22.662100"

}

},

{

"stream_id": 123456,

"start_date": "2021-09-27T10:00:00Z",

"number_of_samples": 60,

"agg_values": {

"min": "0.978500",

"max": "0.980600",

"avg": "0.978837",

"sum": "58.730200"

}

},