Contents
Configuring Usernames and Passwords
Creating Encrypted Password File
Deleting Users from the Encrypted Password File
Configuring mosquitto.conf to Use the Encrypted Password File
Creating Self-Signed Certificate
Installing OpenSSL and Setting up Environment Variables
Creating the Self-Signed Certificate and Keys
Create a Certificate Authority (CA) key pair
Create a CA certificate and use the ca.key to sign it
Create a server key pair for use by the broker
Create a broker certificate request
Use the CA certificate to sign the broker certificate request
Import a Self-Signed Certificate to a Windows Host
Related Links for Additional Information
Installing the MQTT Broker
To install the mosquitto MQTT Broker:
-
Download the mosquitto-2.0.12-install-windows-x64.exe file from https://mosquitto.org/download/.
-
Go to the directory where you downloaded the file. Double-click mosquitto-2.0.12-install-windows-x64.msi.
-
Follow the Eclipse Mosquitto Setup wizard prompts and accept all defaults.
-
If Microsoft Visual C++ is not installed, it will be installed for you as part of the mosquitto installation. Click Accept to accept the license terms, and then click Install.
-
In your desktop, open the Microsoft Services application. Check to see that “Mosquitto Broker” is in “Running” Status with “Automatic” Startup type. If Status is empty, click Start. The mosquitto Broker will automatically start after every system reboot.

Configuring Usernames and Passwords
The following instructions and examples are for the mosquitto MQTT Broker on a Microsoft Windows, 64-bit platform. Other MQTT brokers will have different instructions, configuration, importing credentials, and so forth.
Prerequisites
-
The device must have firmware version 2.29x or newer.
- Microsoft Windows 64-bit operating system
Creating Encrypted Password File
In the FAI Lite scenario, both the devices and the Agent are the clients of the broker. Therefore, the Agent and each device needs its own username and password. Do the following steps:
-
In the C:\etc folder, create a simple text file with each user’s username and password, one for each line. Separate the username and password with a colon as shown below:
-
Configure the credentials for your devices by using the AyyekaGo mobile app.
-
For every device, do the following steps:
-
-
-
-
Click Cellular Settings > MQTT SERVER ADDRESS.
-
In the MQTT Server Address window, type in the username and password of the device that will connect to the MQTT Broker.
-
-
b. Click My Devices, and then click the Export icon. A list of devices is shown.
c. Click EXPORT. Select which app to use for export. For example, you might use Gmail to send the export file to yourself.
d. In the MQTT Broker platform, open the export file, and then copy the usernames and passwords as described in step 1 into the password file.
3. Update the password file as needed.
-
- Encrypt the entire password file. Go to the directory where mosquitto was installed (by default, C:\Program Files\mosquitto).
Notice that all passwords are now encrypted. 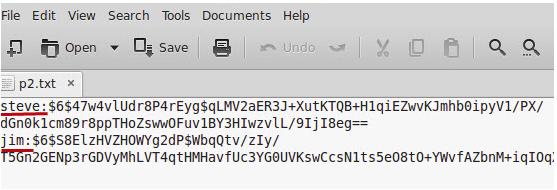
-
- Encrypt the password of only the first user.
Command: mosquitto_passwd.exe -c name_of_passwordfile the_first_user
In our example, the_first_user is steve.
You will be prompted to enter a password for the_first_user.
-
- After adding the first user and password, you can add additional users.
Command: mosquitto_passwd -b name_of_passwordfile the_next_user password
4. After updating the password file, restart the MQTT broker by using the Microsoft Windows Services application.
Deleting Users from the Encrypted Password File
If needed, you can remove individual users from the password file.
Command: mosquitto_passwd -D name_of_passwordfile user_to_be_deleted
Configuring mosquitto.conf to Use the Encrypted Password File
You must configure mosquitto.conf file to use the encrypted password file. Do the following steps:
-
Copy the password file into a separate folder. For example, copy the file into C:\etc\mosquitto\.
2. Edit the mosquitto.conf file to use the password file. Do the following steps:
-
- Set allow_anonymous to false
- Set the password_file path
The password file must not have an extension, such as “.txt”.
For example:
allow_anonymous false
password_file C:/etc/passwordfile
3. Edit the mosquitto.conf file for communication. Do the following steps, as needed:
Note: mosquitto v1.5 authentication is no longer a global setting. It can be configured on a per listener basis. You must enable the per_listener_settings setting.
Examples:
The configuration in mosquitto.conf for only secure communication will be:
###


# It is recommended to have secure communication, so the listener is set to 8883
listener 8883
allow_anonymous false
password_file C:/etc/passwordfile
###
Note: If you set listener to 8883, you must embed the certificates. See Edit the mosquitto.conf file below for an example.
4. After updating the configuration or the password file, restart the mosquitto Broker service by using the Microsoft Windows Services application.
For additional information about configuring the password file, see http://www.steves-internet-guide.com/mqtt-username-password-example/
It is recommended that you use the enterprise's signed certificate. Consult your IT department for instructions about how to use it. In this case, you can now go directly to the Edit the mosquitto.conf file section below.
Alternatively, you can create a self-signed certificate and use that for verification. In this case, continue to the "Creating Self-Signed Certificate” section below.
Creating Self-Signed Certificate
Prerequisites
-
Microsoft Windows 64-bit operating system
-
Microsoft Visual C++
Installing OpenSSL and Setting up Environment Variables
Before you create the self-signed certificate, you must install OpenSSL and set up environment variables. Do the following steps:
-
Download OpenSSL. Use the version for Win64 rather than the Lite version.
-
Run the OpenSSL Installer.
If Microsoft Visual C++ is not installed, the installer will download and install it for you. Run the OpenSSL Installer again and follow the wizard steps.
3. Set up system environment variables.
The environment variables must be set so that OpenSSL functions properly on your system. You need to set OPENSSL_CONF and Path environment variables. Do either of the following steps:
-
-
To set environment variables for the current session only, do the following commands at the command line prompt:
-
set OPENSSL_CONF=C:\Program Files\OpenSSL-Win64\bin\openssl.cfg
-
set Path=%Path%;C:\Program Files\OpenSSL-Win64\bin
-
-
To set environment variables permanently, do the following commands:
-
-
-
-
In the system tray, press the Search icon, and then type in environment.
-
Select Edit the system environment variables. The System Properties window opens.
-
Click the Advanced tab, and then click Environment Variables.
-
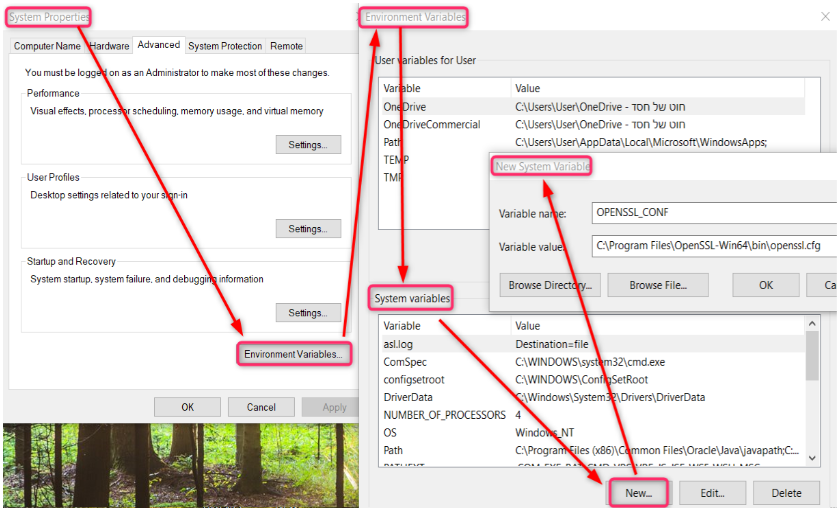
In the System variables section, click New.
-
In the New System Variable window, set the following variables:
-
-
-
-
-
-
set OPENSSL_CONF to be C:\Program Files\OpenSSL-Win64\bin\openssl.cfg
-
Set Path to be C:\Program Files\OpenSSL-Win64\bin
-
-
-
4. Click OK to close the New System Variable window, and then click OK to close the Environment Variables window.
5. Click OK to close the System Properties window.
Note: The changes that you made will take effect only when the window closes, and you open a new command prompt.
Creating the Self-Signed Certificate and Keys
Create the self-signed certificate and keys by doing the following steps at the command line prompt:
Please note that the self-signed certificate files will be created in the folder where the openssl commands will be run from.
- Create a Certificate Authority (CA) key pair.
Command: openssl genrsa -des3 -out ca.key 2048
Generating RSA private key, 2048-bit long modulus (2 primes)
The purpose of the pass phrase is to encrypt the private key. To use an encrypted key, the pass phrase is also needed. In a way, they are two separate factors of authentication. Tip: Write down the pass phrase (pay attention to case) because you will need it when you sign the ca.crt and server.crt certificates.
....................................................................................+++
......................+++++
e is 65537 (0x010001)
Enter pass phrase for ca.key:
Verifying - Enter pass phrase for ca.key: -
Create a CA certificate and use the ca.key to sign it.
Command: openssl req -new -x509 -days 1826 -key ca.key -out ca.crt
Enter pass phrase for ca.key:
You are about to be asked to enter information that will be incorporated into your
certificate request.
What you are about to enter is what is called a Distinguished Name or a DN.
There are quite a few fields, but you can leave some blank
For some fields there will be a default value,
If you enter '.', the field will be left blank.
Country Name (2 letter code) [AU]:US
State or Province Name (full name) [Some-State]: California
Locality Name (e.g., city) []: San Diego
Organization Name (e.g., company) [Internet Widgets Pty Ltd]: Widgets
Organizational Unit Name (e.g., section) []: RND
Common Name (e.g., server FQDN or YOUR name) []: Widgets
Email Address []:
The directory now has the following files:
08/17/2021 11:51 AM 1,348 ca.crt
08/17/2021 11:50 AM 1,773 ca.key
-
Create a server key pair for use by the broker.
Command: openssl genrsa -out server.key 2048
Generating RSA private key, 2048-bit long modulus (2 primes)
..................................................................................+++++
................+++++
e is 65537 (0x010001)
The directory now has the following files:
08/17/2021 11:51 AM 1,348 ca.crt
08/17/2021 11:50 AM 1,773 ca.key
08/17/2021 11:52 AM 1,702 server.key
-
Create a broker certificate request.
When filling out the form, the Common Name is important and is usually the full domain name of the server, the IP address, or the Microsoft Windows name of the computer that is running the mosquitto broker. You must use the same name when configuring the client connection.
Command: openssl req -new -out server.csr -key server.key
You are about to be asked to enter information that will be incorporated
into your certificate request.
What you are about to enter is what is called a Distinguished Name or a DN.
There are quite a few fields, but you can leave some blank
For some fields there will be a default value,
If you enter '.', the field will be left blank.

-------

Country Name (2 letter code) [AU]:US
State or Province Name (full name) [Some-State]:California
Locality Name (e.g., city) []: San Diego
Organization Name (e.g., company) [Internet Widgets Pty Ltd]:Widgets
Organizational Unit Name (e.g., section) []:RND
Common Name (e.g., server FQDN or YOUR name) []:54.72.180.67
Email Address []:
Please enter the following 'extra' attributes to be sent with your certificate request
A challenge password []:widget
An optional company name []:widget -
Use the CA certificate to sign the broker certificate request.
Use the CA key to verify and sign the server certificate. This step creates the server.crt file.
Command: openssl x509 -req -in server.csr -CA ca.crt -CAkey ca.key -CAcreateserial -out server.crt -days 360
Signature ok
subject=C = US, ST = California, L = San Diego, O = widgets, OU = RND,
CN = 54.72.180.67
Getting CA Private Key
Enter pass phrase for ca.key:
Note: If you get the message:
unable to load CA Private Key
13592:error:06065064:digital envelope routines:EVP_DecryptFinal_ex:bad decrypt:crypto\evp\evp_enc.c:610:13592:error:0906A065:PEM routines:PEM_do_header:bad decrypt:crypto\pem\pem_lib.c:461:
It means that you did not enter the pass phrase for ca.key correctly. Run the openssl command again, and then type in the correct pass phrase.The directory now has the following files:
08/17/2021 11:54 AM 1,364 ca.crt
08/17/2021 11:53 AM 1,781 ca.key
08/17/2021 11:55 AM 42 ca.srl
08/17/2021 11:55 AM 1,240 server.crt
08/17/2021 11:55 AM 1,088 server.csr
08/17/2021 11:54 AM 1,702 server.key
Edit the mosquitto.conf File
1. Edit the configuration file to use the following parameters and their values:
per_listener_settings true
listener 8883

allow_anonymous false
password_file c:\Users\...\Certificates\passtest.txt


protocol mqtt
certfile c:\Users\...\Certificates\server.crt

keyfile c:\Users\...\Certificates\server.key

require_certificate false

cafile c:\Users\...\Certificates\ca.crt


use_identity_as_username false

log_dest file c:\mosquitto\mosquitto.log

log_type error
log_type warning
log_type notice
log_type information
# the following setting should be added manually after the logs settings
log_type all

connection_messages true

# the following seeing must added at the end of the file
tls_version tlsv1.2
2. After updating the mosquitto.conf file, restart the MQTT broker through the Microsoft Windows Services application. For details about parameters and syntax in the mosquitto.conf file, see mosquitto.conf man page.
Import a Self-Signed Certificate to a Windows Host
If you defined the listener in the mosquitto.conf file for unsecured communication, skip this step.
If the listener uses secure communication, you must add the self-signed certificate (ca.crt) to the Windows repository. Do the following steps:
-
On your Windows desktop, click Start > Run > MMC. The Microsoft Management Console opens.
-
Click File, and then select Add / Remove Snap In.
-
From the list of available snap-ins, select Certificates, and then click Add.
-
In the Certificates snap-in window, select Computer Account, and then click Next.
-
In the Select Computer window, select Local Computer, and then click Finish.
-
Click OK to exit the Snap-In window.
-
Click [+] next to Certificates > Trusted Root Certification Authorities.

8. Right-click Certificates, and then select All Tasks > Import. The Certificate Import Wizard window opens. Follow the wizard prompts. The self-signed certificate is now trusted by all users.
If you see the following error from self-signed certificates in the log:
2021-09-09 15:24:40.252 +03:00 [WRN] MQTT: TLS certificate has policy errors. RevocationStatusUnknown: The revocation function was unable to check revocation for the certificate.
2021-09-09 15:24:40.252 +03:00 [WRN] MQTT: Verify the certificate or ignore by changing the IgnoreCertificateRevocationErrors setting
The Agent will not work until you change the Ignore Certificate Revocation Errors check box in the Agent's configuration file or the UI.
Unsecured Connection
If you need it, you can set the mosquitto.config file to have an unsecured connection
We recommend avoiding this kind of configuration.
The configuration in mosquitto.conf for only non-secure communication will be:
###
per_listener_settings true
# In non-secure communication, the listener is set to 1883
listener 1883
allow_anonymous false
password_file C:/.../passwordfile.txt
###
Related Links for Additional Information