Table of Contents
Interaction between Master Demo and Virtual Outstation
Interaction between the Wavelet and SCADA station
Step 1: Install the Ayyeka DNP3 Agent service
Step 2: Define the Ayyeka DNP3 Agent keys
Step 3: (Optional) Modify communication between the Ayyeka DNP3 Agent and the Ayyeka server
Step 4: (Optional) Modify communication between the SCADA station and the Ayyeka DNP3 Agent
Step 5: (Optional) Modify configuration files for the Master Demo
Step 6: Launch the Ayyeka.Agents.DNP3 service
Step 7: Data mapping and uploading
Stage B: Change firewall settings
Stage C: (Optional) Change the location of the Ayyeka DNP3 Agent log files
Stage D: Obtain the site information to enter in your SCADA station
Stage E: (Optional) Restrict the data to upload
Package and send log files to Support
Uninstall the Ayyeka DNP3 Agent service
Upgrading the Ayyeka DNP3 Agent service
Introduction to DNP3
Distributed Network Protocol (DNP3) is a set of communications protocols for vendors of power grid SCADA (Supervisory Control and Data Acquisition) systems.
DNP3 is commonly used in electric and water utilities for communication between SCADA master stations and outstations like Remote Terminal Units (RTUs).
- Master station is a host computer that collects data from other devices, monitors all the system equipment, and controls their behavior based on the collected data. The customer's SCADA station is a master station.
- Outstations are remote computers in the field that collect the sensor data and perhaps run local analysis to pass to the master. The customer's peripheral devices are outstations.
Interaction between Master Demo and Virtual Outstation
The Master Demo is a console application that mimics the "master station" or SCADA station. The application has a very basic configuration that can connect to the DNP3 Agent. It can print information and its source (site name, site ID, outstation ID, stream name, stream ID, value, and timestamp, analog tag).
The Master Demo is primarily used after the Ayyeka DNP3 Agent is installed and configured. It is used to troubleshoot integration between the DNP3 Agent and the Master station. The Master Demo receives unsolicited responses, which are Wavelet sample data. Then, it prints the data, along with site and stream information, on the console screen. The configuration of the Master Demo is described in Steps 4 and 5.
The Virtual Outstation resembles an outstation. The virtual station sends virtual samples to the master station to check communication for troubleshooting purposes.
The Virtual Outstation monitors the status of the Ayyeka DNP3 Agent. It generates sequentially increasing numbers about every second and sends them to the SCADA station. You can check the site on SCADA that the numbers are increasing, which indicates that there is communication between the DNP3 Agent and the SCADA station. The Virtual Outstation is configured in Step 4.
Interaction between the Wavelet and SCADA station
Ayyeka’s Wavelet™ is an end-to-end remote monitoring system that delivers end-to-end data to decision makers.
Anywhere from one to several sensors of various types are integrated with each Wavelet device, which is installed onto existing customer infrastructure. The Wavelet device samples the connected sensors at a configurable sampling frequency. The data obtained from the sensors is stored on the Wavelet device, and transmitted via the cellular network to the Ayyeka Cloud server at a configurable transmission frequency.
Each site is represented by a DNP3 outstation. The Ayyeka DNP3 Agent acts as a bridge to pass the data from the Ayyeka Cloud server, as represented by multiple DNP3 outstations, to the master station, which is the customer’s SCADA station.
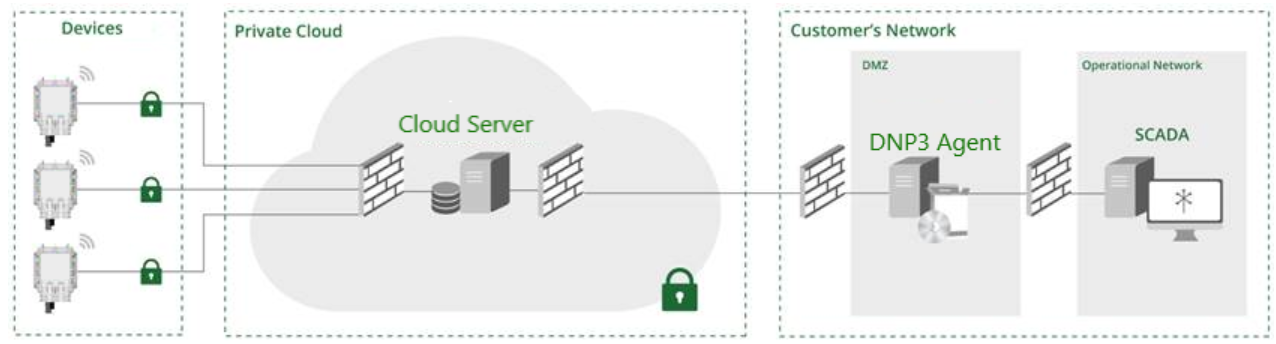
Figure 1: Integration of Wavelet, Ayyeka Cloud Server, Ayyeka DNP3 Agent, and the SCADA station
DNP3 and Ayyeka DNP3 Agent
Ayyeka provides an Ayyeka DNP3 Agent which uploads the data collected by Wavelet sites (outstations) to the customer’s SCADA station (master station) by using the DNP3 protocol.
The Wavelet collects data from various sensors. This data is maintained in Ayyeka’s or in the on-premises database, and can be accessed by the Ayyeka DNP3 Agent. The Ayyeka DNP3 Agent service "wraps" the site's data stored in Ayyeka’s database as DNP3 outstations, and therefore can be accessed via DNP3 protocol by any DNP3 master. The data from the Ayyeka DNP3 Agent is sent as unsolicited responses to the DNP3 master.
Level of Compliance
In the DNP3 protocol, a level 1 device is typically a basic meter transmitting very limited data. A level 2 device is typically a small- to medium-sized controller or RTU. A level 3 device is typically a larger controller or full-featured RTU. Level 4 provides additional functions added to the DNP3 protocol that offer features such as floating point variations, LAN time synchronization, and other higher end functions.
The current Ayyeka DNP3 Agent version supports DNP3 up to and including level 2. The DNP3 Agent supports two formats of data presentation:
- Event analog values are assigned as group 32 with a 32-bit floating point value with flag and event time (group 32 with variation 7)
- Static analog values are assigned as group 30 with a 32-bit floating point value with flag (group 30 with variation 5)
Data Transmission
DNP3 uses TCP communication protocol. The DNP3 master initiates one or more TCP connections, called TCP channels, with the DNP3 outstations, and keeps the connection open. The Ayyeka DNP3 Agent uses the connections to transmit data in analog format via "Unsolicited Responses", meaning each Wavelet site, represented as a DNP3 outstation, spontaneously transmits a response without having received a specific request for data from the master.
Prerequisites
- One of the following operating systems must be installed:
- Microsoft© Windows Server 2008 and above, 64-bit
- Microsoft Windows 7 and above, 64-bit
- Visual C++ Redistributable Package for Visual Studio 2015-2019 must be installed
- The Microsoft Windows firewall must have ports 80 and 443 available for routing TCP sessions.
- Contact Ayyeka Support to receive the DNP3 package installer file.
-
The default secure protocol, TLS v1.2 must be enabled for REST API clients and Microsoft Windows machines that host any of the CSV, DNP3, and OPC-UA agents. To check if TLS 1.2 is enabled, read this article. To enable TLS 1.2, see this article.
TLS v1.2 must be manually installed on Windows Server older than 2019 - it is not installed by default.
TLS v1.2 is automatically installed on Windows Server 2019 and newer.
- You must have an Account/Organization Owner role or an Account/Organization Administrator role to generate the API Client Key and the API Client Secret.
For an on-premises system, you must not generate the REST API keys when logged in as the (super) Admin user. The keys generated by the Admin user will not work.
Step 1: Install the Ayyeka DNP3 Agent service
Install the Ayyeka DNP3 Agent Windows service on a computer with one of the supported Microsoft Windows operating systems, in the same network in which the SCADA station is installed, by doing the following steps:
- Open the .ZIP file, and double-click the .MSI file to launch the Ayyeka.Agents.DNP3 Setup wizard.
- Follow the on-screen instructions.
Tip: If you want to specify a different installation folder than the default C:\Ayyeka\Ayyeka.Agents.DNP3, select Custom installation in the Choose Setup Type window, and then enter the destination folder.
After the installation is complete, the following changes are made in your environment:
- The Ayyeka.Agents.DNP3 service is added to the list of Windows services.
- In non-custom installations, an Ayyeka directory is added to the C drive, with an Ayyeka.Agents.DNP3 subfolder. In custom installations, the installation folder is the one specified in the setup wizard.
- After the service is started, a directory for logs is created in C:\Temp\logs, containing the following log files:
- Ayyeka.agents.dnp3-all.log
- Ayyeka.agents.dnp3-err.log
- Ayyeka.agents.dnp3-samples.log
Do not delete the .MSI package installer file. It will be needed if you need to uninstall the Agent.
Step 2: Define the Ayyeka DNP3 Agent Keys
-
Get the API Client Key and Secret by following this guide.
Important: Record the API Client Key and the API Client Secret in a secure place because there is no way to access the API Client Secret in the future. You need them in step 4 below.
- Open a command prompt window, and then navigate to the installation directory (the default installation directory is C:\ayyeka\Agents.Dnp3).
- At the command prompt, type in Agents.Dnp3.Cli.exe to see the main CLI options.
- The first time you set up the DNP3 Agent, you must configure it.
a. At the command prompt, type in Agents.Dnp3.Cli.exe config.
b. At the prompt, type in the API Client Key and Secret that you got above.
c. At the installation directory, look for the file AyyekaAPIClient.dll.config and set a configuration depending on your product:
Configuration for Cloud:
|
<applicationSettings> |
Configuration for on-premises:
If you configure your on-premises server for SSL communication internally, use HTTPS. Otherwise, use the default HTTP protocol, as shown below.
|
<applicationSettings> |
Note: For the authentication_url and api_url, if you configured your on-premises server for SSL communication internally, use HTTPS. Otherwise, use HTTP.
Step 3: (Optional) Modify communication between the Ayyeka DNP3 Agent and the Ayyeka server
In the installation folder (by default, C:\Ayyeka\Ayyeka.Agents.Dnp3), open APIClient.dll.config with a text editor, and optionally edit the <appSettings> section.
<?xml version="1.0" encoding="utf-8"?>

    <configuration>

        <appSettings>

            <add key="client_id" value=""/>

            <add key="client_secret" value=""/>

            <add key="preserved_data" value=""/>

            <add key="preserved_data_backup_dir" value=""/>

            <add key="preserved_data_backup_interval_hours" value="1"/>

            <add key="between_upload_suspend_minutes" value="5"/>

            <add key="upload_from_hours_on_init" value="24"/>

            <add key="timeout" value="120000"/>

            <add key="ClientSettingsProvider.ServiceUri" value=""/>

            <add key="authentication_url" value="http://restapi.ayyeka.com/auth/token"/>

            <add key="api_url" value="http://restapi.ayyeka.com/v2.0/"/>

        </appSettings>
Note: For the authentication_url and api_url, if you configured your on-premises server for SSL communication internally, use HTTPS. Otherwise, use HTTP.
- If you did not enter the Client ID and Client Secret values (that were generated in the previous step) by using the CLI, enter them now in the following properties in the configuration file. For example:
 <add key="client_id" value="52A2105BF13A47A916024BA66CED"/>
 <add key="client_secret" value="UMus/Fv4S9VR+K2HWJYsHrVUgC5dys6hdazE="/>
2. You can change the preserved_data value. This value specifies the location (such as C:\Temp\Ayyeka) of the files listing the Ayyeka DNP3 Agent working state. One such file, for example, lists the ID of the last sample retrieved from each data stream. If the value is empty (default), the location is the Ayyeka.Agents.DNP3 subfolder.
Ensure that the directory listed in the preserved_data field has write permissions.
3. You must change the preserved_data_backup_dir value to specify the location of the directory hosting backups of the Ayyeka DNP3 Agent working state.
There is no default backup directory. If you do not specify a directory, backups are not saved.
If the directory that you specify does not exist, it will be created for you.
-
- For the authentication_url, use http://your_URL:85/auth/token
- For the api_url, if the SW version is 3.35.0 or older, use http://your_URL:85/v1.0. Otherwise, for newer SW versions, use http://your_URL:85/v2.0.
Note: For the authentication_url and api_url, if you configured your on-premises server for SSL communication internally, use HTTPS. Otherwise, use HTTP.
9. Save the changes and close the file.
Step 4: (Optional) Modify communication between the SCADA station and the Ayyeka DNP3 Agent
In the installation folder (by default: C:\Ayyeka\Ayyeka.Agents.DNP3), open Ayyeka.Agents.DNP3.exe.config with a text editor, and then edit the <userSettings> section to change the default values.
<userSettings>

<Ayyeka.Agents.Dnp3.Settings>

 <setting name="IpAddress" serializeAs="String">
    <value>127.0.0.1</value>
  </setting>
  <setting name="DefaultChannelPort" serializeAs="String">
    <value>20000</value>
  </setting>
  <setting name="MasterDnp3Address" serializeAs="String">
    <value>1</value>
  </setting>
  <setting name="RetrieveSamplesSleepMinutes" serializeAs="String">
    <value>5</value>
  </setting>
  <setting name="SendUnsolicitedEventsOnMasterReconnect" serializeAs="String">
    <value>True</value>
  </setting>
  <setting name="UploadFromMinutesAgoOnReconnect" serializeAs="String">
    <value>0</value>
  </setting>
  <setting name="NumberOfSamplesToUploadInARoundPerSite" serializeAs="String">
    <value>10</value>
  </setting>
  <setting name="WaitTimeBetweenSendSamplesMilliseconds" serializeAs="String">
    <value>50</value>
  </setting>
  <setting name="WaitTimeBetweenGetSamplesMilliseconds" serializeAs="String">
    <value>250</value>
  </setting>
  <setting name="SamplesQueueSize" serializeAs="String">
    <value>1000</value>
  </setting>

   <setting name="LocalOutstationAddressing" serializeAs="String">

    <value>True</value>

  </setting>
  <setting name="TcpRetryMilliseconds" serializeAs="String">
    <value>5000</value>
  </setting>
  <setting name="AllowVirtualOutstation" serializeAs="String">
    <value>False</value>
  </setting>
  <setting name="VirtualChannelPort" serializeAs="String">
    <value>10000</value>
  </setting>
  <setting name="VirtualOutstationId" serializeAs="String">
    <value>0</value>
  </setting>
  <setting name="InvokeMethodRetrySeconds" serializeAs="String">
    <value>20</value>
  </setting>
  <setting name="ChannelMappingPath" serializeAs="String">
    <value>Dnp3ChannelMapping.xml</value>
  </setting>

   <setting name="SendUsageDataConsentAccepted" serializeAs="String">

    <value>False</value>

  </setting>

  <setting name="Dnp3LogLevel" serializeAs="String">

    <value>INFO</value>

  </setting>

  <setting name="Dnp3ProtocolLogLevel" serializeAs="String">

    <value>ERROR</value>

  </setting>

  <setting name="Dnp3TCPLogLevel" serializeAs="String">

    <value>ERROR</value>

  </setting>

 </Ayyeka.Agents.Dnp3.Settings>

</userSettings>
- Set the IpAddress value to the IP address of the network card (usually the IP address of the DNP3 Agent Windows computer) to which the Ayyeka DNP3 Agent listens, and to which the DNP3 Master will connect. If the Ayyeka DNP3 Agent is installed on the same computer as the DNP3 Master, the IP address should be 127.0.0.1.
- Set the DefaultChannelPort value to the TCP port that the Agent gets requests from and sends data to the SCADA master. The default is port 20000.
- Set the MasterDnp3Address value to the address of the SCADA master. If you installed Master Demo, set value=0. The default value is 1 (the typical address of the SCADA master).
- Set the RetrieveSamplesSleepMinutes value. This value specifies the amount of time, in minutes, between each data upload from the Ayyeka Cloud server. The minimum value is 1 minute and the default value is 5 minutes.
- Set the SendUnsolicitedEventsOnMasterReconnect value to True or False. If value=True, the DNP3 Agent sends the last sample from every stream to the SCADA master when the SCADA master reconnects.
- Set the UploadFromMinutesAgoOnReconnect. If master reconnects to the Agent after it was off for a while, you can configure how to handle missing samples. Assign the value '0' to pull all samples that were missed while the master was down. Assign a value of any positive number to pull samples for the number of minutes that the master was down. For example, if you set the value to 60, then all missed samples during the latest 60 minutes that the master was down are pulled. If the master was down for less than 60 minutes, all samples are pulled.
- Set the NumberOfSamplesToUploadInARoundPerSite. The Agent will upload the number of samples determined by a trade-off between the number of Sites and the number of streams in each Site.
-
The higher the number, the longer the Agent stays on each Site because more streams of each Site are uploaded. The other Sites wait, but more streams of each Site are uploaded in each Round.
-
The lower the number, the Agent stays on each Site less because fewer streams of each Site are uploaded. All Sites are covered quickly, but fewer streams of each Site are uploaded in each Round.
-
-
Set the WaitTimeBetweenSendSamplesMilliseconds. This value is the number of milliseconds between each sample upload from the Agent to the master. The default is 50ms.
-
Set the WaitTimeBetweenGetSamplesMilliseconds. This value is the number of milliseconds between each download of the Agent from Ayyeka REST API.
-
Set SamplesQueueSize. The maximum number of samples permitted in a queue. The Agent might have more samples in the queue than the maximum number if the queue received more from the API. In this case, the queue is full and sampling stops until the queue has less than SampleQueueSize.
-
Set LocalOutstationAddressing to True to assign a number, beginning with 1, for each outstation. A value of False assigns the site ID of the device to the outstation. The default is True.
If you are upgrading and have existing DNP3 mappings, see the Upgrading the Ayyeka DNP3 Agent service section for details.
12. Set the TcpRetryMilliseconds value to the number of milliseconds between TCP connection attempts. The default is 5000.
13. Set the AllowVirtualOutstation value to False to disable the Virtual Outstation feature. Change the value from True when you need to use a Virtual Outstation for checking the communication between the outstation and the master.
14. Set the VirtualChannelPort value to the TCP port that the Agents requests from and sends data to the virtual outstation. Default value = 10000.
15. Set the VirtualOutstationId value = 0 to avoid a collision with other outstations.
16. Set the InvokeMethodRetrySeconds value to the amount of time, in seconds, to retry running the configuration file. For example, if value=20, then if you changed the configuration file and it failed to load, the configuration will be reloaded every 20 seconds.
17. Set the ChannelMappingPath value. This value specifies the name and path of the Dnp3ChannelMapping.xml file. If empty (default), the location is the Ayyeka.Agents.DNP3 subfolder.
18. Set the SendUsageDataConsentAccepted value to True if you agree to send data usage information to Support for software improvement and debugging purposes. Change the value=False if you do not want any information sent. This value is set during the installation procedure.
19. Set the DNP3LogLevel value. This value specifies the minimum severity level to display in the logs. The available levels are DEBUG, INFO, WARN, ERROR, and FATAL. This log is the main log file for the Agent. The default is INFO.
20. Set Dnp3ProtocolLogLevel value. This value specifies the minimum severity level to display in the logs. The available levels are DEBUG, INFO, WARN, ERROR, and FATAL. This log provides low-level information about the DNP3 communication. The default is ERROR.
21. Set Dnp3TCPLogLevel value. This value specifies the minimum severity level to display in the logs. The available levels are DEBUG, INFO, WARN, ERROR, and FATAL. This log provides low-level information about the TCP communication. The default is ERROR.
22. Save the changes, and then close the file.
Step 5: (Optional) Modify configuration files for the Master-demo
You can modify configuration files for the Master Demo (
(Ayyeka\Agents.Dnp3\Agents.Dnp3.MasterDemo.exe.config) and the DNP3 Agent (Ayyeka\Agents.Dnp3\APIClient.dll.config).
In Ayyeka\Agents.Dnp3\Agents.Dnp3.MasterDemo.exe.config, in the <appSettings> section, the key “preserved_data” must have the same value as in the <appSettings> section of Ayyeka.Agents.Dnp3\APIClient.dll.config. The value of "preserved_data" is the location of the data that is ready for the Master Demo to consume. Consequently, if the values are not the same, data will not reach the Master Demo.
In Ayyeka\Agents.Dnp3\Agents.Dnp3.MasterDemo.exe.config, in the <userSettings> section, you can modify some parameters in the Master-demo:
- The setting OptionsToShowOnScreenLog can be changed to show different values on the Master-Demo. Separate the values by a comma (,). The values SiteId, SiteName, StreamId, StreamName, AnalogTagIndex, SampleValue, SampleTime, and OutstationId can be changed. The following table describes each setting.
- The setting IsConvertToUTCSampleTime can be set to True if you want the samples’ time to be converted to UTC on the Master-demo.
- The setting MasterAddress changes the Master-demo DNP3 address. The default is 1.
The following table describes the SCADA parameters.
|
Field |
Description of SCADA parameters |
|
SiteId |
The ID of the site in the Ayyeka server. |
|
SiteName |
The name of the site in the Ayyeka server. |
|
StreamId |
The ID of the stream in the Ayyeka server. |
|
StreamName |
The name of the stream in the Ayyeka server. |
|
AnalogTagIndex |
This is the DNP3 analog index ID for the particular site and stream. |
|
SampleValue |
The value of the sample. |
|
SampleTime |
The sample date of the sample most recently sent from this stream by the Ayyeka DNP3 Agent to the SCADA station. |
| OutstationId | The automatically generated ID number of the Outstation in the SCADA station. The Outstation represents each Ayyeka Wavelet. |
Step 6: Launch the Ayyeka.Agents.DNP3 service
Depending on the Windows version, navigate to Computer Management > Services and Applications > Services (it is also possible to launch the Windows "services.msc" application from a Windows command line or launch bar). Right click the Ayyeka.Agents.DNP3 service, and then select Start.
Step 7: Data mapping and uploading
Overview
Typically, Wavelet devices in the field generate one or more data streams such as Level, GSM signal, and Battery Life. Each Wavelet site is mapped to a DNP3 outstation. Each outstation is the data source for a number of DNP3 index IDs, where each index ID represents a specific Wavelet stream.
Whenever the Ayyeka DNP3 Agent encounters a new stream when it connects to the Ayyeka Cloud server, it generates a new corresponding DNP3 index ID.
Data from sites is uploaded to the SCADA station via TCP channels. By default, the Ayyeka DNP3 Agent groups all the sites under the single “Default” channel. Furthermore, any additional new site is automatically allocated to the “Default” TCP channel.
When the Ayyeka.Agents.DNP3 service is started, it creates a Dnp3ChannelMapping XML file that lists all the channels, their sites, their outstation IDs, if active or not, and their names. The Site ID is the same Site ID that is seen in the UI. The Outstation ID is automatically generated by the Agent. The default state for Active is true unless you change it to false ("false" means that the site will not be included in the data retrieval). Name is automatically generated from the Site Name in the UI.
This file is updated each time the Ayyeka DNP3 Agent retrieves data from the Ayyeka Cloud server. In the example Dnp3ChannelMapping file shown below, all the sites are allocated to the Default TCP channel with port no. 20000.
<?xml version="1.0"?>
<ChannelMapping xmlns:xsd="http://www.w3.org/2001/XMLSchema" xmlns:xsi="http://www.w3.org/2001/XMLSchema-instance">
  <Channels>
    <Dnp3Channel Name="Default" Port="20000">
      <Sites>
        <Site Id="2901" OutstationId="1" Active="true" Name="Wastewater: Tank Level" />
        <Site Id="3102" OutstationId="2" Active="true" Name="Wastewater: Quality" />
        <Site Id="3103" OutstationId="3" Active="true" Name="Natural Gas: Regulator Station" />
        <Site Id="3304" OutstationId="4" Active="true" Name="Water: Flow" />
        <Site Id="3305" OutstationId="5" Active="true" Name="Wastewater: CSO, Level and Flow" />
        <Site Id="3306" OutstationId="6" Active="true" Name="Water: PRV" />
      </Sites>
    </Dnp3Channel>
  </Channels>
</ChannelMapping>
Stage A: Distribute the load
For load balancing purposes, it is recommended to allocate no more than 30 sites to a single TCP channel. If you are uploading data from over 30 sites, you should create additional TCP channels, as follows:
- Stop the Ayyeka.Agents.DNP3 service.
- In the installation folder (by default, C:\Ayyeka\Ayyeka.Agents.DNP3), open Dnp3ChannelMapping.xml with a text editor, and then modify it as follows:
- Define additional TCP channels, each with a unique name and port number.
- Allocate the sites to the channels as you see fit. You might, for example, group sites in channels based on the type of data they are monitoring. In the example shown below, all the Pressure monitoring sites were grouped under the newly created Pressure_channel channel.
<?xml version="1.0"?>
<ChannelMapping xmlns:xsd="http://www.w3.org/2001/XMLSchema" xmlns:xsi="http://www.w3.org/2001/XMLSchema-instance">
  <Channels>
    <Dnp3Channel Name="Default" Port="20000">
      <Sites>
        <Site Id="29" OutstationId="1" Active="true" Name="Stream Demo" />
        <Site Id="109" OutstationId="3" Active="true" Name="Tap Water Quality" />
        <Site Id="110" OutstationId="4" Active="true" Name="Turbidity" />
        <Site Id="112" OutstationId="6" Active="true" Name="Wastewater quality" />
        <Site Id="194" OutstationId="8" Active="true" Name="Demo Site" />
      </Sites>
    </Dnp3Channel>
    <Dnp3Channel Name="Pressure_channel" Port="20001">
      <Sites>
        <Site Id="30" OutstationId="2" Active="true" Name="Pressure Demo" />
        <Site Id="111" OutstationId="5" Active="true" Name="Pressure Monitoring" />
        <Site Id="113" OutstationId="7" Active="true" Name="Pressure Monitoring 2" />
      </Sites>
    </Dnp3Channel>
  </Channels>
</ChannelMapping>
3. Restart the Ayyeka.Agents.DNP3 service.
Stage B: Change firewall settings
If the Ayyeka DNP3 Agent and your SCADA station are hosted on two separate machines, make the following firewall setting changes. In the machine hosting the SCADA, open the ports defined in Dnp3ChannelMapping.xml for outgoing TCP communication in the user's internal network. In the example in the figure above, those ports are port 20000 and port 20001.
Stage C: (Optional) Change the location of the Ayyeka DNP3 Agent log files
In the installation folder (by default, C:\Ayyeka\Ayyeka.Agents.DNP3), open the Log4net.config file with a text editor, and then make the following changes:
- Specify the folder where the outstation's logs will be located. By default, the folder for all logs is C:\Temp\Logs. For example:
<file value="C:\Temp\Logs\Ayyeka.agents.dnp3-all.log" />
<file value="C:\Temp\Logs\Ayyeka.agents.dnp3-err.log" />
<file value="C:\Temp\Logs\Ayyeka.agents.dnp3-samples.log" />
2. Ensure that the folder(s) you specify have write permissions.
3. Save the changes, and then close the file.
Stage D: Obtain the site information to enter in your SCADA station
To be able to upload the data from the streams into your SCADA station, you need to learn certain parameters’ values for entering into your SCADA station. To do so:
- Open a command prompt window, and then navigate to C:\Ayyeka\Agents.Dnp3\.
- At the command prompt, type in Agents.Dnp3.Cli.exe info.
The command output provides the following information for all the sites in the database. See the table above for information about the SCADA parameters.
The following screen capture shows sample output.
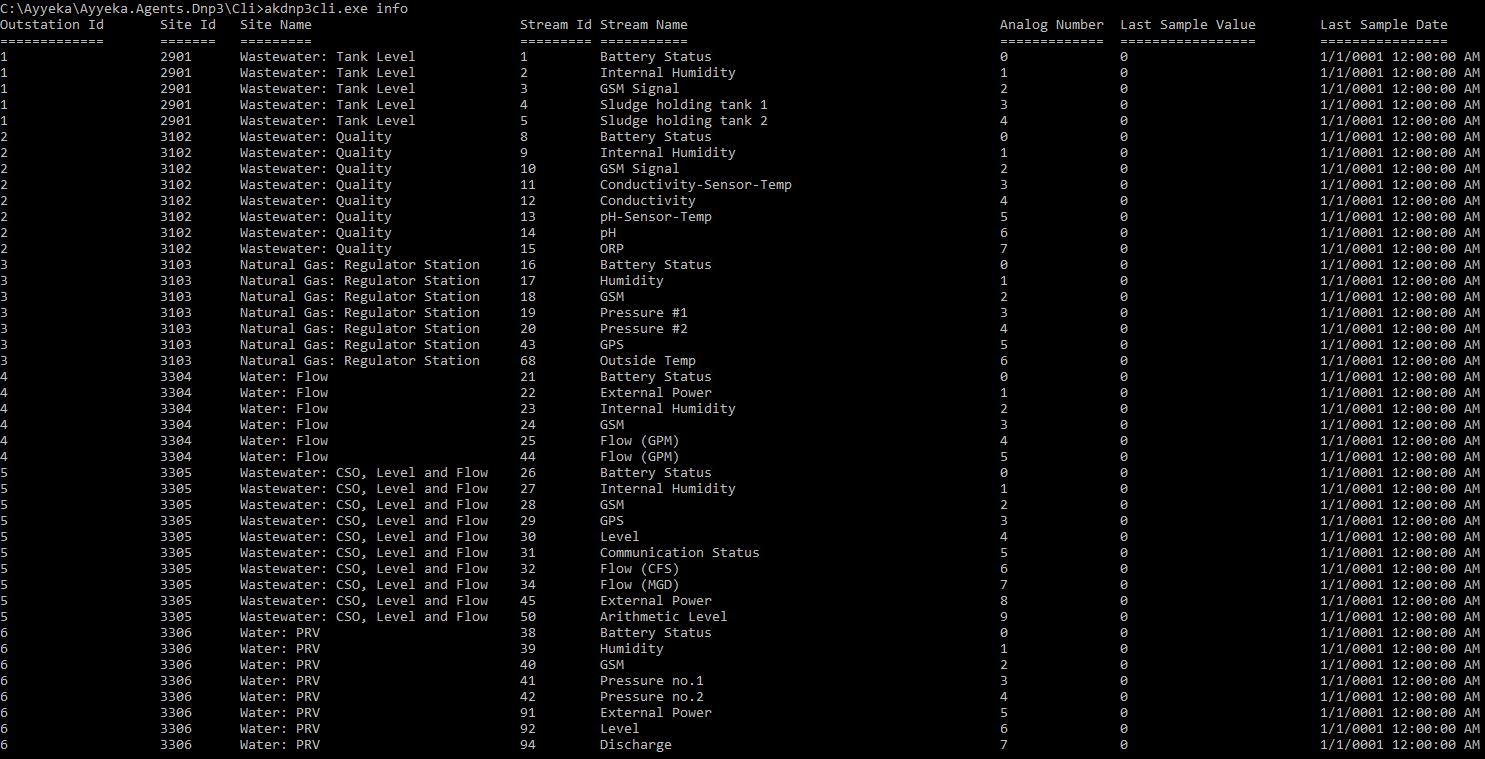
3. For each site and stream whose data you want to upload to your SCADA station, note the site’s Site ID and the Outstation ID.
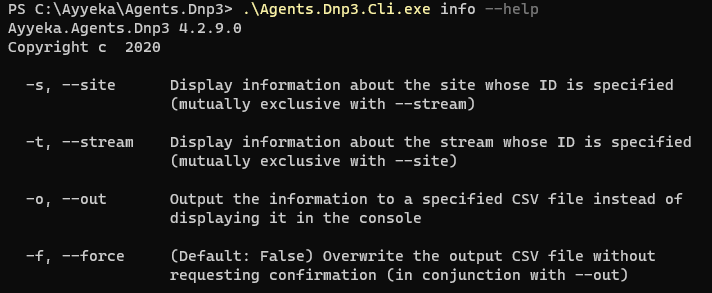
4. For your convenience, you can use the various options of the Agents.Dnp3.Cli.exe info CLI command to:
a. Show information for a specific site only.
b. Show information for a specific stream only.
c. Output information to a CSV file.
To view the syntax of these options, type at the command prompt: Agents.Dnp3.Cli.exe info --help (note the two hyphens '--').
The following output is displayed:
Examples:
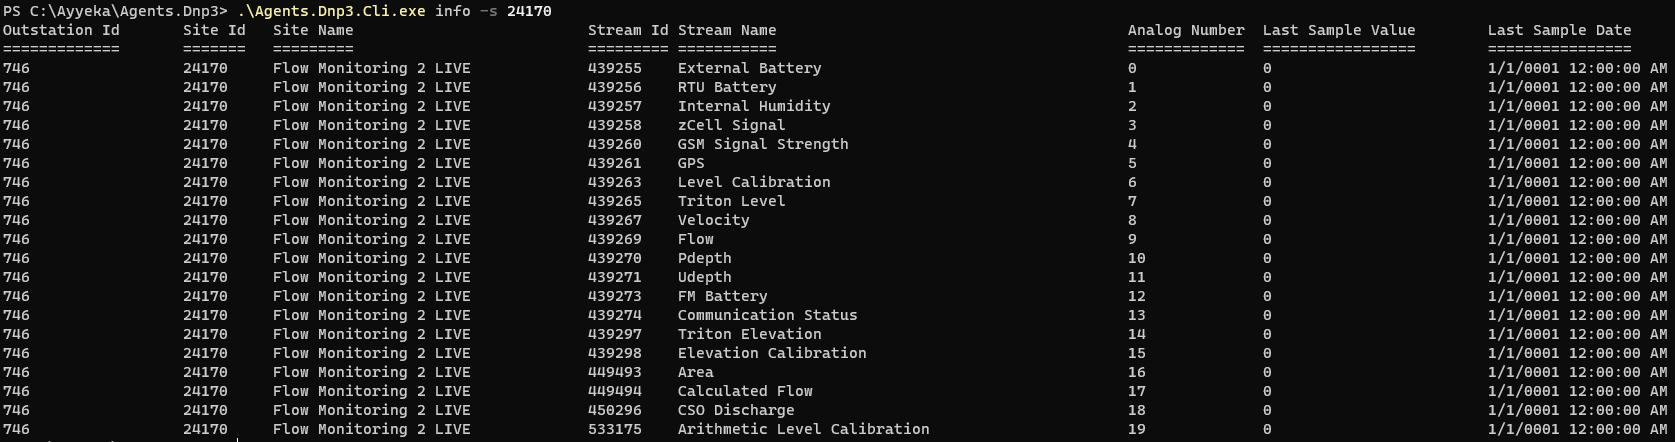
- To display information for site 24170 only, run Agents.Dnp3.Cli.exe info –s 24170.
The output will look similar to the following:
- To display information for stream 439263 only, run Agents.Dnp3.Cli.exe info –t 439263.
The output will look similar to the following:

- To export information for site 3304 to the info_out a CSV file in C:\temp, run akdnp3cli.exe info -s 3304 –o c:\temp\info_out.csv.
The generated CSV file will look similar to the following output:
OutstationId,SiteId,SiteName,StreamId,StreamName,ExternalId,LastSampleId,LastSampleDate
4,3304,Water: Flow,21,Battery Status,0,0,1/1/0001 12:00:00 AM
4,3304,Water: Flow,22,External Power,1,0,1/1/0001 12:00:00 AM
4,3304,Water: Flow,23,Internal Humidity,2,0,1/1/0001 12:00:00 AM
4,3304,Water: Flow,24,GSM,3,0,1/1/0001 12:00:00 AM
4,3304,Water: Flow,25,Flow (GPM),4,0,1/1/0001 12:00:00 AM
4,3304,Water: Flow,44,Flow (GPM),5,0,1/1/0001 12:00:00 AM
Stage E: (Optional) Restrict the data to upload
You might need to instruct the Ayyeka DNP3 Agent to upload only some of the sampling data that resides in the Ayyeka server to your SCADA station. Partial uploads can be useful, for example, if you are only interested in a specific stream’s data from a certain date onward.
The option of restricting data upload can be utilized also after the Ayyeka DNP3 Agent is up and running. For example, if certain data is erroneously deleted from the SCADA station and you wish to back-fill, you can use the restrict option to instruct the Ayyeka DNP3 Agent to re-upload the particular data you are missing.
The restrict option is implemented by running the Agents.Dnp3.Cli.exe send-from CLI command. Using the command, you can specify that for a particular stream, the Ayyeka DNP3 Agent should only collect sample data from a specific sample ID onward, or from a specific date onward.
To restrict data upload:
- Open a command prompt window, and then navigate to C:\Ayyeka\Agents.Dnp3\Agents.Dnp3.Cli.exe
- At the command prompt, type in Agents.Dnp3.Cli.exe send-from.
For example:
-
- To upload from stream 142, samples starting from sample ID 106954, run:
- Agents.Dnp3.Cli.exe send-from –t 142 –i 106954.

-
- To upload from stream 142, all its samples starting from the very first one, run:
Agents.Dnp3.Cli.exe send-from –t 142 –i 0
- To upload from stream 142, all its samples starting from the very first one, run:

-
- To upload from stream 142, samples starting from January 27, 2017, run:
Agents.Dnp3.Cli.exe send-from –t 142 –d 2017-01-27:
The system contacts the API to learn which sample ID corresponds to the given date.
- To upload from stream 142, samples starting from January 27, 2017, run:
Package and send log files to Support
If you need to troubleshoot the DNP3 master-outstation communication or setup, you might also need to send the DNP3 Agent configuration, XML, and log files to support@ayyeka.com for troubleshooting. The default location of the log file is C:/temp/logs/.
- In a command window, go to the installation directory, and then type the command Agents.Dnp3.Cli.exe pack-logs.
- Type in the file path where the packed log files will be stored.
- (Optional) Type in your email address and password. This address will be the email Sender.
- (Optional) If you want to send the zip file to support@ayyeka.com, press Enter. Otherwise, type in an email address to send the logs to.
Uninstall the Ayyeka DNP3 Agent service
To uninstall the Ayyeka.Agents.DNP3 Windows service, do either of the following actions:
- In the Ayyeka.Agents.DNP3 installation folder (by default, C:\Ayyeka\Ayyeka.Agents.DNP3), double-click the Ayyeka.Agents.DNP3 installation file. In the wizard that appears, select Remove.
- In the computer’s control panel, select Add/Remove programs, right-click the program Ayyeka.Agents.DNP3, and then select to Uninstall.
After the uninstall is complete, the Ayyeka.Agents.DNP3 service is removed.
Upgrading the DNP3 Agent service
1. It is recommended to back up the following files in the installation folder (by default, C:\Ayyeka\Ayyeka.Agents.DNP3\):
-
- Dnp3ChannelMapping.xml
- AyyekaPreservedData.xml
- Ayyeka.Agents.DNP3.exe.config
- AyyekaAPIClient.dll.config
- Log4net.config
2. Use the DNP3 Agent installer of the currently installed version to uninstall the Agent.
3. Use the new DNP3 Agent installer to install the new version of the Agent.
4. Copy the backed up Dnp3ChannelMapping.xml and AyyekaPreservedData.xml files to the installation directory.
5. Open the new configuration files and update their content with content from the original configuration files. Check what parameters and values you want to include.
If your current DNP3 Agent version is 4.2.7 or older, and you are upgrading to Agent version 4.2.8 or newer, note the following:
- When installing the DNP3 Agent, the Agent creates the Ayyeka.Agents.DNP3.exe.config file and sets the LocalOutstationAddressing property to True. This will generate new Outstation IDs for each Site ID. In the DNP3 Agent versions older than 4.2.7, the Outstation ID is the same as the Site ID. If the property is left at the default value of True, the DNP3 Agent will generate new Outstation IDs for each Site that is different for each Site ID. This would require a reconfiguration of your SCADA system to identify the new Outstation IDs and pull in their data.
- To avoid reconfiguring your SCADA system, set the property LocalOutstationAddressing to False. This will continue to use each Site ID as the Outstation ID. The risk of this step is that when a new Site ID is greater than 65535, the SCADA system will not recognize the Site nor retrieve its data. In this case, it is necessary to set the property to True and reconfigure the SCADA to the newly-generated Outstation IDs.