Contents
Preliminary Step - Installing the OPC UA service
Integrating Ayyeka Server with SCADA System
Choosing the Integration Method
Integrating Ayyeka Server Directly with SCADA OPC UA
Enable the Ayyeka Server’s OPC UA Agent
Integrating Ayyeka Server with SCADA OPC UA using OPC UA client
Recommended Practices for OPC UA HA
Install and configure the UaExpert UA Client
Install and Configure a Kepware OPC UA Client
Scope of Operation
The Agent supports OPC UA DA (Direct Access) and HA (Historical Access). For OPC UA DA, the server (Cloud or on-premises) sends the latest data sample from all requested streams. If historical data is needed, OPC UA HA allows retrieval by specifying date ranges in the SCADA system.
Prerequisites
- Perform the following prerequisite actions:
- Get in touch to request Ayyeka OPC-UA Agent Installer file.
- Extract the contents of the zip file to a temporary folder (for example: C:\temp\Ayyeka\Installation).
- Install Microsoft .NET Framework 4.8 or newer. To determine which version, if any, of .NET Framework is installed on your server, see How to: Determine which .NET Framework versions are installed.
- Copy the Opc.Ua.CertificateGenerator.exe file into the directory C:\Program Files (x86)\Common Files\OPC Foundation\UA\v1.0\Bin. If the directory does not exist, create it.
- Generate the API Client Key and Secret by following this guide.
-
-
You must not generate the REST API keys when logged in as a user with the Partner role.
For an on-premises system, you must not generate the REST API keys when logged in as the (super) Admin user. The keys generated by the Admin user will not work.
-
-
-
The default secure protocol TLS v1.2 must be enabled for REST API clients and Microsoft Windows machines that host any of the CSV, DNP3, and OPC-UA agents. To check if TLS 1.2 is enabled, read this article. To enable TLS 1.2, see this article.
-
TLS v1.2 must be manually installed on Windows Server older than 2019 - it is not installed by default.
TLS v1.2 is automatically installed on Windows Server 2019 and newer.
To check that TLS 1.2 is installed on your Windows Server and that .NET Framework is configured to support TLS, see How to enable TLS 1.2 on clients.
Preliminary Step - Installing the OPC UA service
Install the OPC UA Windows service in the same network in which the SCADA system is installed. Do the following steps:
- Double-click the Ayyeka.Agents.OpcUa.msi file (accessible from the downloaded zip file).
- The Ayyeka OPC UA setup wizard is launched. Follow the on-screen instructions. If you wish to specify an installation folder that is different from the folder (C:\Ayyeka\Ayyeka.Agents.OpcUa), select Change installation, and enter the destination folder.
It is highly recommended to use the folder (C:\Ayyeka\Ayyeka.Agents.OpcUa). Do not use the folder C:\Program Files.
<userSettings>
    <Ayyeka.Agents.OpcUa.Properties.Settings>
      <setting name="ClientId" serializeAs="String">
        <value>your_client_id</value>
      </setting>
      <setting name="ClientSecret" serializeAs="String">
        <value>your_client_secret=</value>
      </setting>
    </Ayyeka.Agents.OpcUa.Properties.Settings>
  </userSettings>
Configuration for Cloud(default):
<applicationSettings>
    <Ayyeka.Agents.OpcUa.Properties.Settings>
      <setting name="Ayyeka_Agents_OpcUa_Rest_Authentication" serializeAs="String">
        <value>https://restapi.ayyeka.com/auth/token</value>
      </setting>
      <setting name="Ayyeka_OpcUa_Rest_API" serializeAs="String">
        <value>https://restapi.ayyeka.com/v2.0/</value>
      </setting>
    </Ayyeka.Agents.OpcUa.Properties.Settings>
</applicationSettings>
Configuration for on-premises:
<applicationSettings>
    <Ayyeka.Agents.OpcUa.Properties.Settings>
      <setting name="Ayyeka_Agents_OpcUa_Rest_Authentication" serializeAs="String">
        <value>http://<your_URL>:85/auth/token</value>
      </setting>
      <setting name="Ayyeka_OpcUa_Rest_API" serializeAs="String">
        <value>http://<your_URL>:85/v2.0/</value>
      </setting>
    </Ayyeka.Agents.OpcUa.Properties.Settings>
</applicationSettings>
4. Open the Log4net.config file (located in the Agent installation folder) with a text editor, and make sure that the directory paths for the following files exist.
-
- AyyekaUaServer–all.log
- AyyekaUaServer–err.log
If you need to change directory paths or values for any of the parameters, change them in the config file.
<?xml version="1.0" encoding="utf-8"?>
<log4net>
  <appender name="GeneralLog" type="log4net.Appender.RollingFileAppender">
    <file value="C:/temp/logs/AyyekaUaServer-all.log"/>
    <threshold value="DEBUG"/>
    <appendToFile value="true"/>
    <maxSizeRollBackups value="10" />
    <maximumFileSize value="10MB" />
    <rollingStyle value="Size" />
    <datePattern value="_yyyy-MM-dd_HH" />
    <layout type="log4net.Layout.PatternLayout">
      <conversionPattern value="%date [%t] %-6p %-10c %m%n"/>
    </layout>
  </appender>
  <appender name="ErrorLog" type="log4net.Appender.RollingFileAppender">
    <file value="C:/temp/logs/AyyekaUaServer-err.log"/>
    <threshold value="WARN"/>
    <appendToFile value="true"/>
    <maxSizeRollBackups value="10" />
    <maximumFileSize value="10MB" />
    <rollingStyle value="Size" />
    <datePattern value="_yyyy-MM-dd_HH" />
    <layout type="log4net.Layout.PatternLayout">
      <conversionPattern value="%date [%t] %-6p %-10c %m%n"/>
    </layout>
  </appender>
  <root>
    <level value="ALL" />
    <appender-ref ref="GeneralLog"/>
    <appender-ref ref="ErrorLog"/>
  </root>
</log4net>
Integrating Ayyeka Server with SCADA System
When you use the OPC UA communication protocol to communicate with your SCADA system, the Agent acts as an OPC UA server and the SCADA system is the client. The SCADA system issues a pull request to the Agent to securely pull data from the Agent. The data is pulled via HTTPS if the Agent is configured for SSL. Otherwise, the data is pulled via HTTP.
Choosing the Integration Method
If your SCADA system supports OPC UA, follow the instructions in Integrating Ayyeka Server Directly with SCADA OPC UA.
Alternatively, if your SCADA system does not support OPC UA, you need to install and configure an OPC UA client (such as a Kepware server) to act as a communication mediator between the Ayyeka server and your SCADA system. For example, see the instructions in Install and Configure a Kepware OPC UA Client to install that client. Then, see Integrating Ayyeka Server with SCADA OPC UA using OPC UA client.
Integrating Ayyeka Server Directly with SCADA OPC UA
If your SCADA system supports OPC UA, do the following steps:
- Enable the Ayyeka Server’s OPC UA Agent.
- Exchange certificates and configure SCADA to go to the Ayyeka OPC UA server endpoints.
Enable the Ayyeka Server’s OPC UA Agent
The Server Agent serves as the OPC UA Server.
To enable the OPC UA Agent, do the following steps:
- On the machine hosting the Ayyeka server, start the Ayyeka.Agents.OpcUa service, and switch the Startup Type to Automatic.
- Validate that Ayyeka.Agents.OpcUa is running by verifying that no errors appear in the log file AyyekaUaServer–all.log. The location of this log file is specified in the Log4net.config file (which is located in the Agent installation folder). The default location of the log file is C:/temp/logs/.
- Copy the "Listener on (opc-tcp and http) " URLs from the log. These are the endpoints to which the OPC UA clients are going to connect.
Integrating Ayyeka Server with SCADA OPC UA by using an OPC UA client
If your SCADA system does not support OPC UA but you wish to integrate the Ayyeka server with your SCADA system using OPC UA, you need to:
Recommended Practices for OPC UA HA
There are two common use cases for OPC UA HA:
- Send information between two timestamps: start time and end time
- Send information of the most recent time period as specified by the last number of minutes. For example, information from the last 30 minutes, every minute.
Troubleshooting TLS
-
The date-time format is yyyy:mm:ddThh:mm:ssZ. For example, 2015-10-13T18:23:52Z.
The “T” is a literal way to separate the date from the time. The “Z” means "zero-hour offset", or also "Zulu time" (UTC).
-
Restarting TLS service gives error message about key container. A sample error message might be:
2021-09-09 18:11:08,691 [7] ERROR Shutting down because of an error. Shutdown reason : The requested key container was not found.
System.Security.Cryptography.CryptographicException: The requested key container was not found.
at System.Security.Cryptography.CspKeyContainerInfo.get_UniqueKeyContainerName() at Opc.Ua.CertificateFactory.Load(X509Certificate2 certificate, Boolean ensurePrivateKeyAccessible) at Opc.Ua.CertificateIdentifier.Find(Boolean needPrivateKey) at Opc.Ua.ServiceHost.InitializeSinglePolicy(Type contractType, ApplicationConfiguration configuration, BindingFactory bindingFactory, EndpointConfiguration endpointConfiguration, List`1 endpoints, MessageSecurityMode securityMode, String securityPolicyUri) at Opc.Ua.ServerBase.CreateSinglePolicyServiceHost(IDictionary`2 hosts, ApplicationConfiguration configuration, BindingFactory bindingFactory, IList`1 baseAddresses, ApplicationDescription serverDescription, MessageSecurityMode securityMode, String securityPolicyUri, String basePath) at Technosoftware.UaServer.Base.GenericServer.InitializeServiceHosts(ApplicationConfiguration configuration, BindingFactory bindingFactory, ApplicationDescription& serverDescription, EndpointDescriptionCollection& endpoints) at Opc.Ua.ServerBase.Start(ApplicationConfiguration configuration) at Technosoftware.UaServer.UaServer.Start(IUaServerPlugin uaServerPlugin, String configurationSection, String[] args)
The "key" referred to in this message does not refer to an API key, but rather to TLS.
If you need to restart the TLS service and then you receive this error message, it indicates a problem with your TLS configuration.
- Ensure that TLS is configured and enabled correctly.
- Review the list of common TL issues.
Appendix
Enhanced Security
In the OpcServer.Config.xml file, comment out the following XML properties:
<SecurityPolicies>

<!-- <ServerSecurityPolicy>

<SecurityMode>None_1</SecurityMode>

<SecurityPolicyUri>http://opcfoundation.org/UA/SecurityPolicy#None</SecurityPolicyUri>

<SecurityLevel>0</SecurityLevel>

</ServerSecurityPolicy>

-->


<!-- <Allows anonymous users -->

<!-- <ua:UserTokenPolicy>

<ua:TokenType>Anonymous_0</ua:TokenType>

</ua:UserTokenPolicy>

-->
Install and configure the UaExpert UA Client
What is the UaExpert:
The UaExpert is a third-party tool that is highly suggested for the Ayyeka clients using the OPC-UA Agent tool. The UaExpert will help troubleshoot and verify that all the data is being sent from the Ayyeka platform to the client.
From where to install: UA Expert
*Note: The OPC-UA Agent must be installed and configured as explained in previous sections.
Configuring the UaExpert tool:
Project → Server → right click “Add”

Choose → Custom Discovery
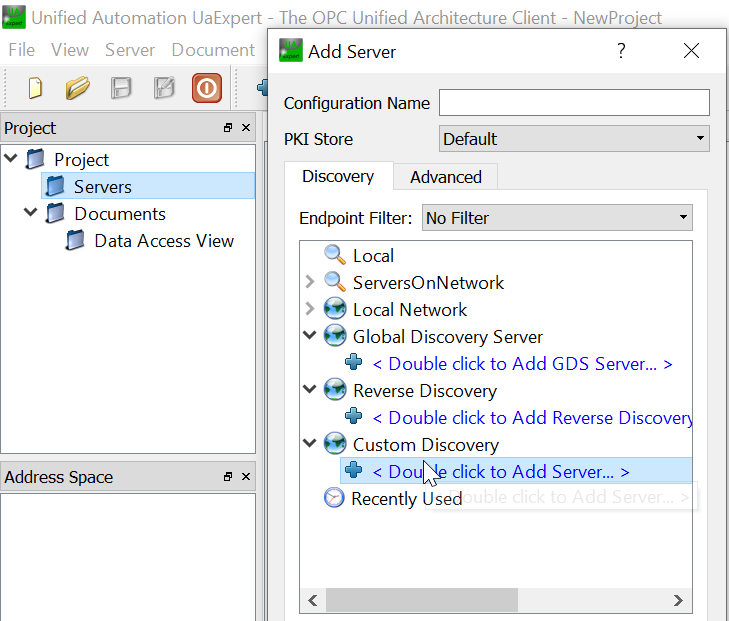
Define it to be: opc.tcp://localhost:32160/AkOpcUaServer

Press “rebrowse”
Press “connect”
When using the FAI Lite solution, it should be opc.tcp://localhost:48030 [this is taken from C:\Program Files (x86)\Ayyeka Technologies\FAI.Lite\appsetting.json


Click the check box “Accept the server certificate temporarily for this session” and press Continue.

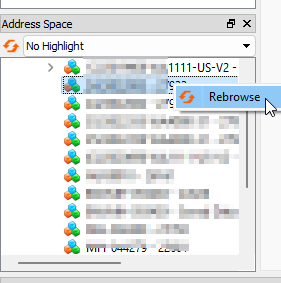
The Sites should be visible at the bottom left.

Right click on the relevant Site and press "Rebrowse"
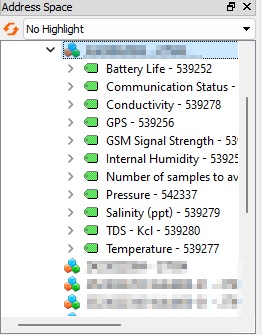
All of the Site's streams will be visible:
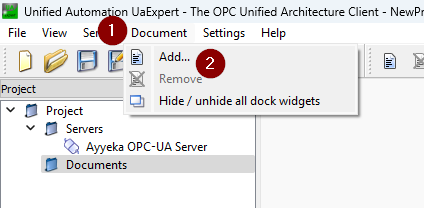
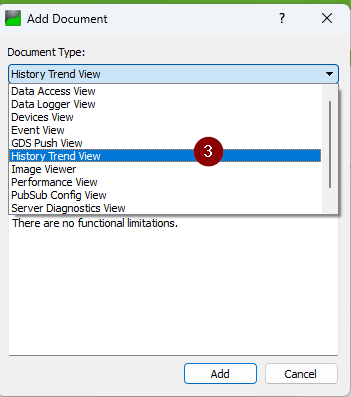
To see the HA (historical access) Go to: Document --> Add --> "History Trend View"
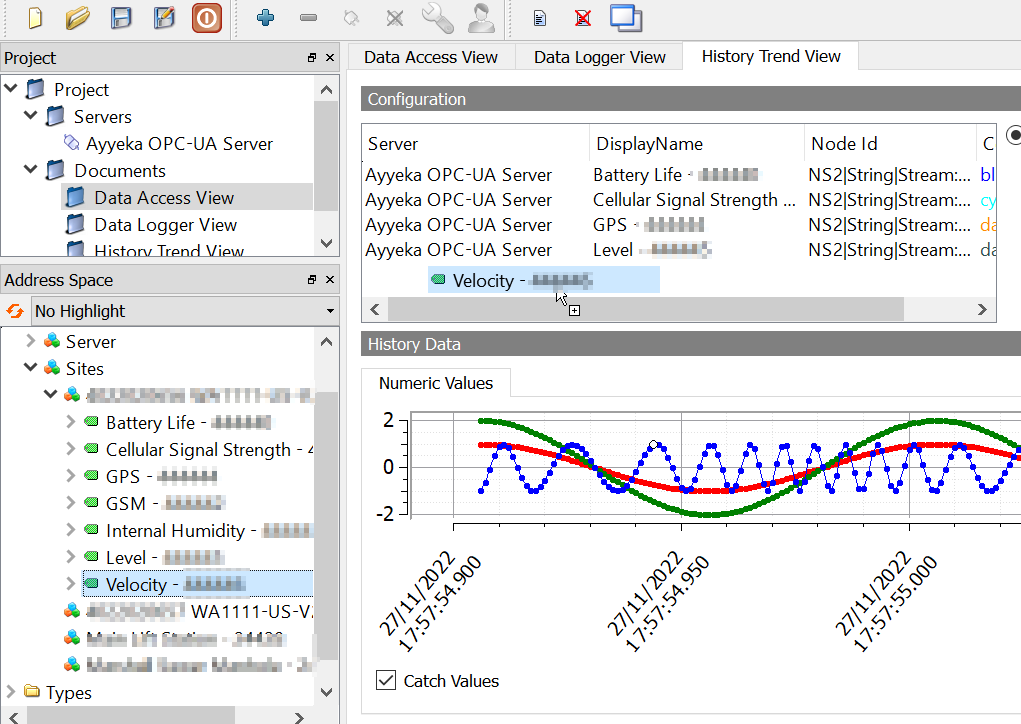
Then you can drag the relevant streams to the "Configuration" and see them in the graph:
Install and Configure a Kepware OPC UA Client
This section provides instructions for installing and configuring an OPC UA client to act as a communication mediator between the Ayyeka server and your SCADA system. There are various types of OPC UA clients; this section provides instructions for the case where the OPC UA client is a Kepware server.
Modify the specific instructions to adapt them to the OPC UA client of your choice.
-
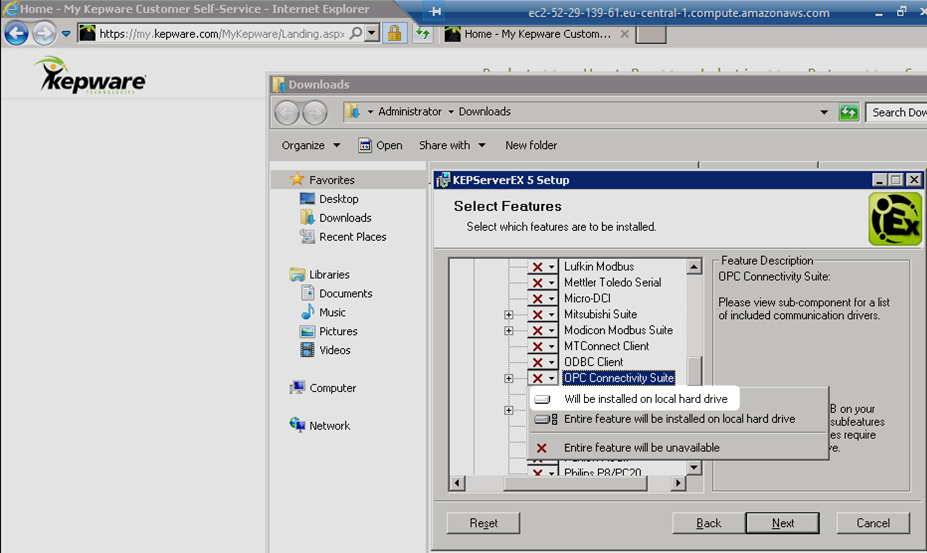
Install Kepware with the OPC Connectivity Suite.

2. Add the KepwareServerEx certificate to the Ayyeka server’s trusted certificate list, as follows:
a. Click OPC UA Configuration.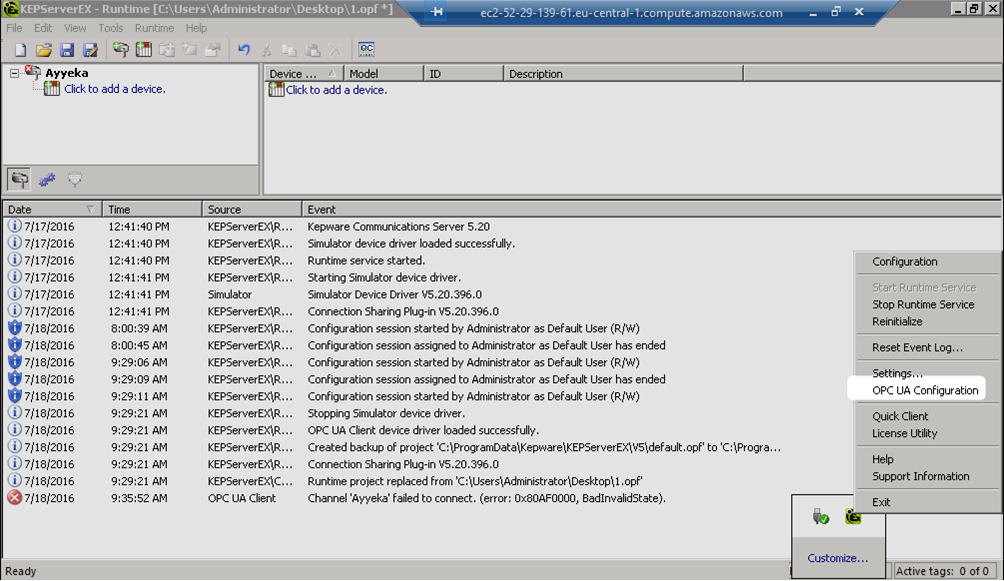
b. Go to Instance Certificates, and then click Export client driver certificate.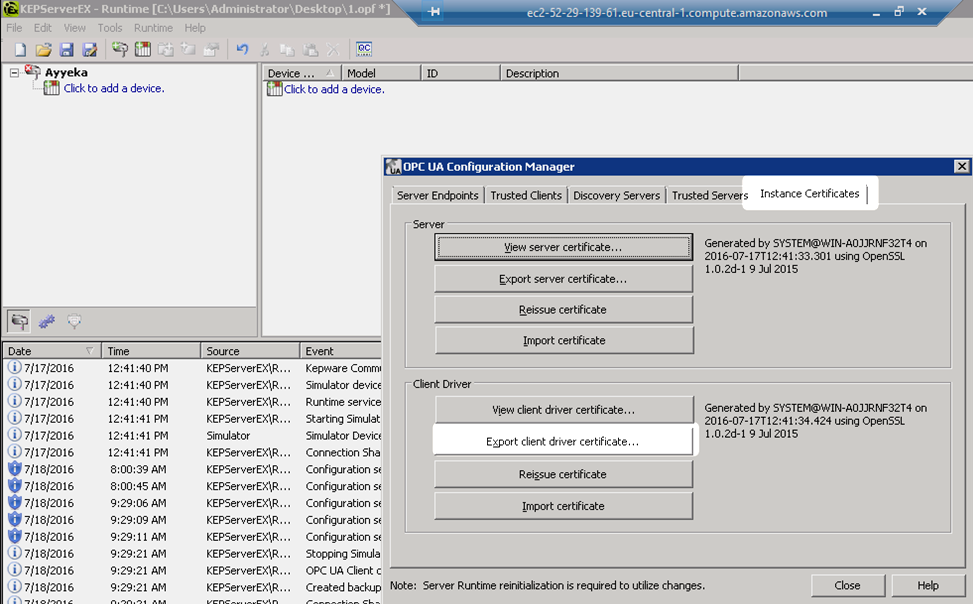
c. Save the certificate.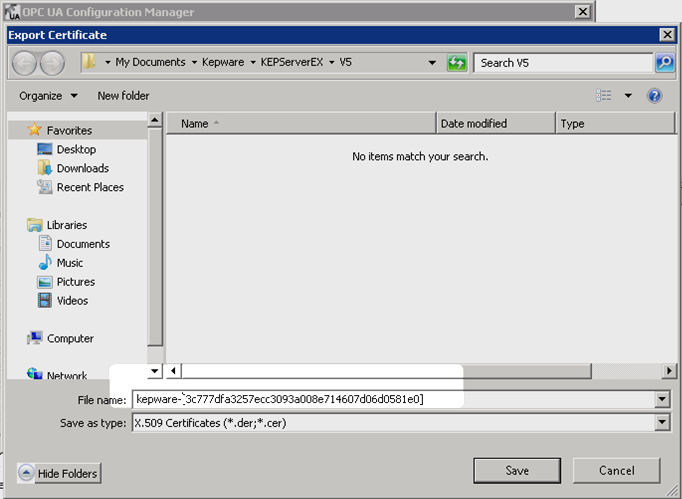

d. Copy the certificate file to the following path on the Ayyeka Server:
C:\ProgramData\Ayyeka\CertificateStores\UA\Applicationscerts
3. Create a new channel for the Ayyeka OPC UA Server, as follows:
a. Select Click to add a channel. The New Channel wizard is launched.
b. In the Identification screen, name the Channel name. Click Next.
c. In the New Channel - Device Driver window, select the Device driver to be OPC UA Client. Click Next.
d. Do not change the Write Optimizations default settings. Click Next.
e. In the New Channel-UA Server window, define the Ayyeka OPC UA Server Endpoint URL, as follows:
Endpoint URL: opc.tcp://<host-name>:32160/AkOpcUaServer
Note: Make sure the host is reachable from the remote machine. By default, ports 32160 and 32161 are used.
Security Policy: Basic256
Message Mode: Sign and Encrypt
f. If prompted, click Yes to trust the Ayyeka OPC UA Server certificate. Click Next.
g. Do not change the Timeouts defaults settings. Click Next.
h. In the New Channel - Authentication window, enter the credentials provided by Ayyeka, of the pre-defined “User” user. Review the settings, and then click Finish.
You can change these credentials using the Ayyeka Management UI, but in that case you must also change them accordingly in the OPC UA agent config file (contact support@ayyeka.com for help).
i. Define a device for each Ayyeka Site:
-
- Define the Device name to be the Ayyeka site name.
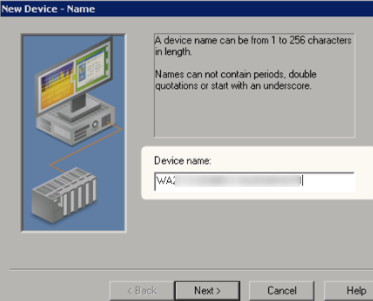
- Define the Device name to be the Ayyeka site name.
-
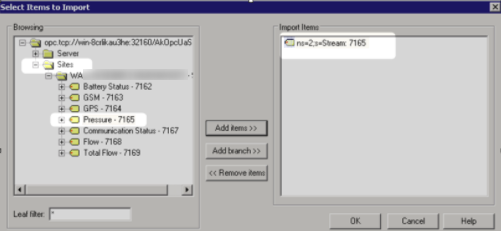
- In the Import screen, click Select import items.
- Select the Data Streams that you need to import.
-
- In the Summary screen, review the configuration, and then click Finish.
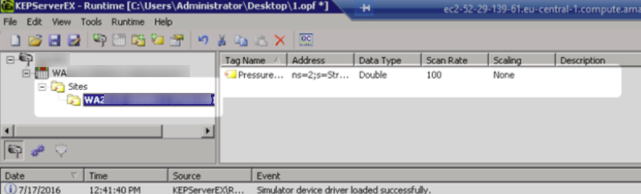
- Verify that all the data streams appear in the Tag Name table.