Contents
View and Configure a WaveCam app
Select streams and overlay their data values
Delete or Rename a WaveCam app
Download or Delete a Time-lapse Video
Prerequisites:
-
You must have the Account Administrator role.
-
The WaveCam feature must be installed. If you do not see WaveCam in the Fleet UI, contact Sales@ayyeka.com.
-
A camera stream must be configured for a device.
-
The device must have FW version *_CAMR_v2.366 or newer. The device can have 8 digital channels (including the camera channel).
To create a WaveCam app:
-
In the left pane of the UI, click Applications, and then click WaveCam. The WaveCam Apps pane opens.
-
Click the Plus sign
 . The Add a New Application window opens.
 -
Select the Account, Site, and Camera stream for the WaveCam application. Only streams that are related to the camera are in the selection list.
To view and configure a WaveCam app:
-
In the left pane of StreamView, click Applications, and then click WaveCam. The WaveCam Apps pane opens.
-
In the Account dropdown list, select the Account where the WaveCam app is assigned. A list of apps for the selected account is displayed. At the top of every WaveCam app is the timestamp of the last frame.
-
Click the app that you need. The app opens with the frames that were captured during a time range.
Camera frames are displayed for a seven-day period. If a frame has not been taken in more than seven days, the message “No images were found for the selected time period”. You can choose an earlier seven-day period from any given historical point.
 in the upper right corner. The WaveCam Configuration window opens.
 -
-
You can overlay data from several streams onto the application. The streams can be from a different Site. Select the Site and the stream.
-
Click Save. The time-lapse video with a graph of the overlaid streams is displayed.
-
The following screen shot shows a row of red vertical lines and timestamps below the frame. Each vertical line represents a camera frame.
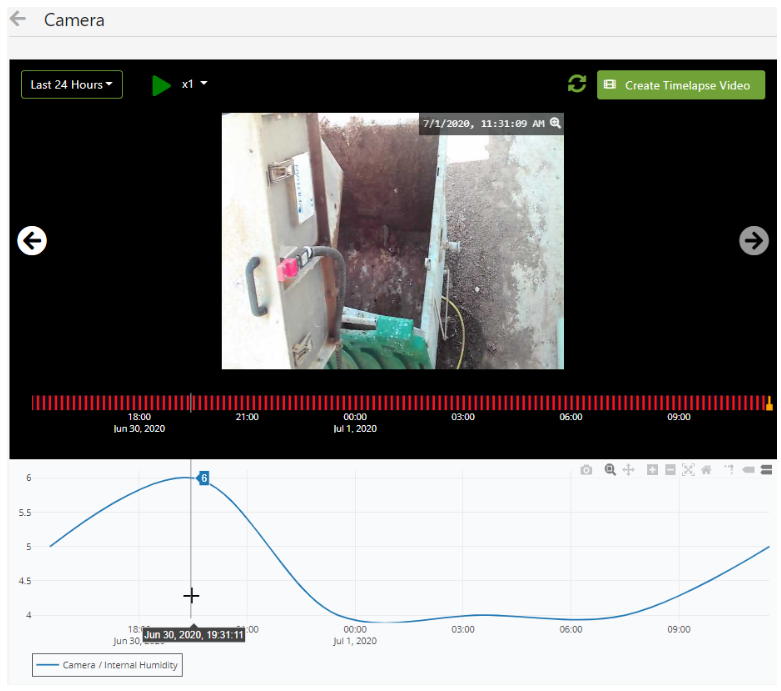
Move the slider across the x-axis of the graph to get the values of each overlaid stream that are associated with the video frame for each point in time.
5. (Optional) To change the time range, select the time range from the dropdown list in the upper left corner of the image. The custom range can include a maximum of 7 days.
6. (Optional) To replay the image, click the Auto Play icon  and select the number of replay times.
7. (Optional) To create a time-lapse video. click Create Timelapse Video. Do the following actions:
-
-
Select the start and end video frames. All other frames are grayed out.
-
To use images between specified hours, select Time Range Filter, set the beginning and end times. For example, if you want to use only nighttime images, you might set the beginning time to 10:00PM and the end time to 06:00AM.
-
To download the video or make the video into a picture, click the three vertical dots
 , and then click Download or Picture in picture.
 -
To give the link of the video to customers, click the Copy Link icon.

-
To delete or rename a WaveCam app:
-
In the left pane of the UI, click Applications, and then click WaveCam. The WaveCam Apps pane opens.
-
In the Account dropdown list in the upper right corner of the window, select the Account where the WaveCam is assigned.
-
lick the app that you want to delete or rename.
-
Click the cogwheel
in the upper right corner. The WaveCam Configuration window opens. -
To delete the app, click Delete.
-
To rename the app, type in a new name in the Name field, and then click Save.
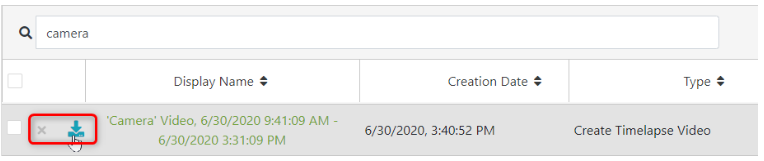
To download or delete a time-lapse video:
-
In the left pane of the UI, click Fleet, and then click Tasks. The Tasks pane opens.
-
In the Search field of the Tasks pane, type in the name or part of the name of the time-lapse video in the Search field. An example might be “cam” (for "camera"). All appropriate videos are listed.
-
Hover the mouse pointer over the time-lapse video that you need. Click the video name to see the video and ensure it's the correct video.
-
In the left-most column, do either action:
-
-
Click the X icon to delete the video
-
Click the Tray icon to download the video
-