The camera template can be applied to the Site where the WaveCam will be installed. No further configuration is needed. Contact Ayyeka Support to apply the camera template.
The WaveCam can be used with the Wavelet V2™ and Wavelet 4R™ devices. Note however, that the Wavelet 4R device has considerably less storage capacity for camera frames.
WaveCam is intended primarily for use with Ayyeka Cloud. If you need to use the WaveCam with an on-premises system, contact Ayyeka Support .
Watch a three-minute video for an overview of the WaveCam.
Contents
Overview of Camera and Image Streams
Manual Creation and Configuration of Image and Camera Streams
Overview of Camera and Image Streams
The WaveCam is a 2 mega-pixel camera with built-in JPEG compression and a serial (RS232/RS485) output. Communication with the camera is done over proprietary protocol. The camera can take interval-based and event-based photographs.
The camera device is a serial sensor and is associated with a serial channel type. Camera images cannot be transmitted through a serial channel, so you’ll need two data streams:
-
Camera stream is on a SERIAL SINT32 channel. This stream is the serial sensor of the camera device, and it is configured for sampling rates and camera parameters.
-
Image stream is on a BLOB (Binary Large Object) channel. A BLOB channel receives the raw images, but it does not do actual sampling.
In the screen shot below, the Camera stream is the serial sensor of the camera device. It is on channel type SERIAL SINT32 and channel number 0. The Image stream receives the raw images. It is on channel type BLOB and channel number 0. 
Prerequisites
-
Contact support@ayyeka.com to apply the camera template to the Site to the camera of your choosing. Alternatively you can configure the device via the Wavecam App.
-
You must have a camera-enabled version of Firmware installed on the device. In the Device area of the the UI, the Site Name or the Serial Number must have the string CAMR_v followed by the FW version. See the following screenshot.
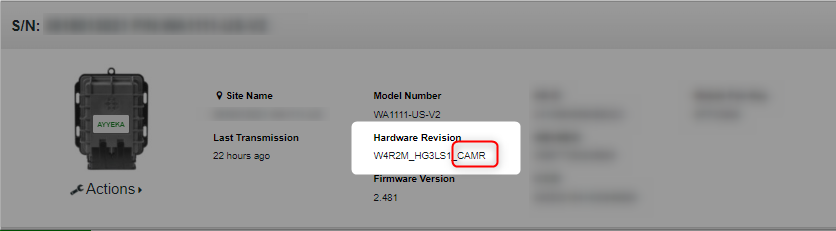
If your device does not have camera firmware contact Ayyeka Support to perform the firmware update to camera firmware.
Manual Creation and Configuration of Image and Camera Streams (outdated - consider using configure site to use wavecam feature)
Warning: This is outdated. Ayyeka strongly recommends using Configure Site for Wavecam feature of the Wavecam app.
Do the following steps:
- Manually configure the SERIAL SINT32 channel:
-
-
In the Sites Tree pane, click the device name with the WaveCam, and then open the Advanced Device Configuration.
-
Click Serial > CHANNEL > 0.
-
Configure the serial channel according to the following table:
-
|
Parameter |
Required Value |
Details |
|
bus_baud |
115200 |
|
|
bus_parity |
serial.BUS_PARITY_NONE |
|
|
interface_type |
serial.IT_RS485 |
|
|
active |
serial.AS_ON |
Channel is active/enabled. Samples will be recorded. |
|
sample_handler |
serial.SH_SPINEL_CAMERA |
|
|
wake_time_ms |
5000 |
Specify the length of time, in milliseconds, that the camera is powered on prior to when the device requests a photo from the sensor. The frequency at which the camera is powered on, is determined by the sample_interval. The wakeup time interval will be the maximum time of all channels in the group. Example: The wakeup time interval is 5000ms. The WaveCam takes a photo 5000ms (5 seconds) after it is powered on. |
|
slave_addr |
1 |
The slave address of the camera. |
|
extra_param |
String Format: "A,B,C,D"
A: resolution 0 = SSR_640x480 1= SSR_800x600 2= SSR_1600x1200
B: compression 0 = SSCR_MINIMUM 1 = SSCR_LOW 2 = SSCR_MEDIUM 3 = not implemented 4 = SSCR_HIGH 5 = SSCR_MAXIMUM
C: LED lights A = Auto 1 = On 0 = Off
D: Buffer size (Byte) 0 = 512 1 = 1024 2 = 2048 3 = 4096 4 = 8192 |
Sets the camera resolution, compression, LED light usage, and the size of the buffer. Use this parameter to tweak the camera's default behavior. Be sure to include the quotation marks (") at the beginning and end of the string. Separate the values with a comma (,) and no spaces. A: Resolution is in pixels. B: Compression – The less compression:
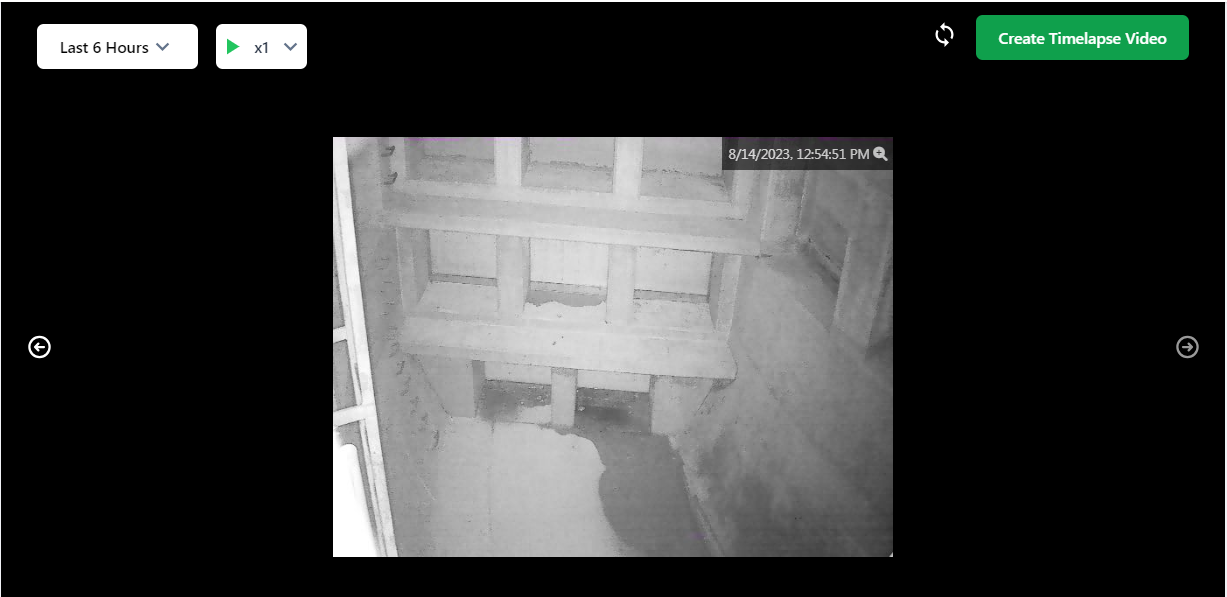
C: LED lights - The WaveCam uses a smart illumination function so that the LED only turns on when necessary. If needed, the LED turns ON automatically three seconds prior to image capture, remains ON for three seconds during capture, and then turns OFF automatically.
Lighting at Night
D: Buffer size - The larger the buffer size:
Example: The string “0,4,0,4” means to use 640x480 resolution with high compression. Keep the LED light off. Use the largest buffer, 8192 bytes. |
 Lighting During the Day
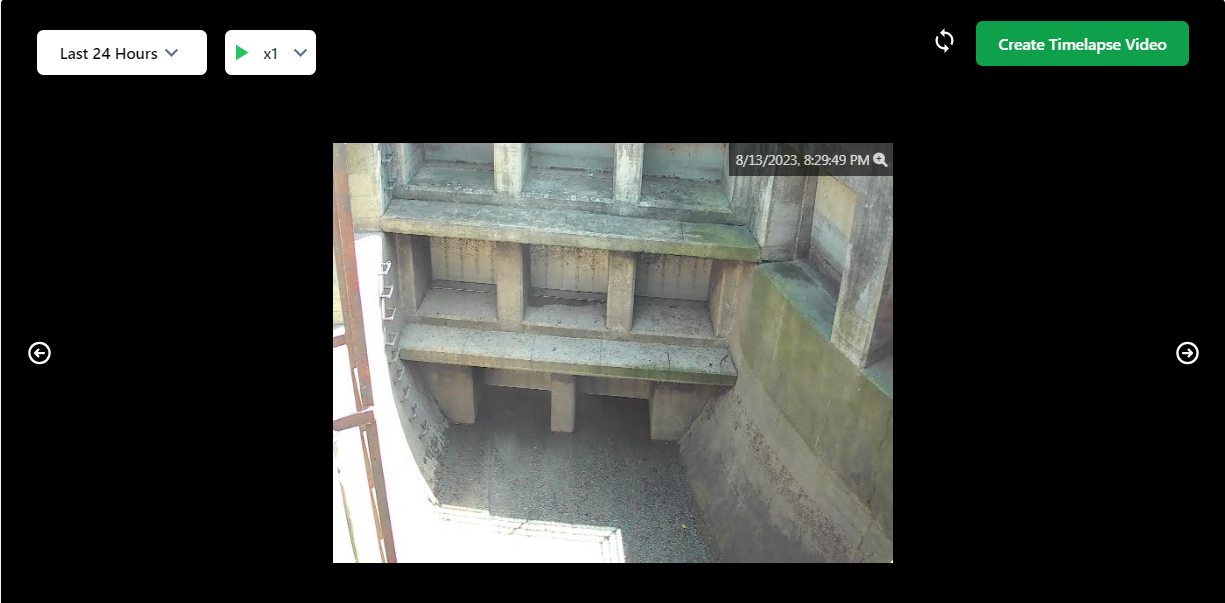
2. Manually create the Image and Camera streams:
-
-
-
The channel type must be BLOB.
-
In the Stream Name field, type in Image.
-
In the Stream Type – Engineering Units field, select Image().
-
-
-
-
-
The channel type must be SERIAL SINT32.
-
In the Stream Name field, type in Camera.
-
In the Stream Type – Engineering Units field, select Image().
-
-
Field Installation
Installation Tips:
- AyyekaGo mobile app can show stream values but not images. As a result, you cannot use the mobile app to verify the camera position during installation at the site. It is recommended that, while installing the camera on-site, bring a field laptop with internet access to check the images from Fleet to adjust the camera's position.
- Do not position the camera facing shiny objects or directly facing the east-west sun.
To install the camera sensor:
-
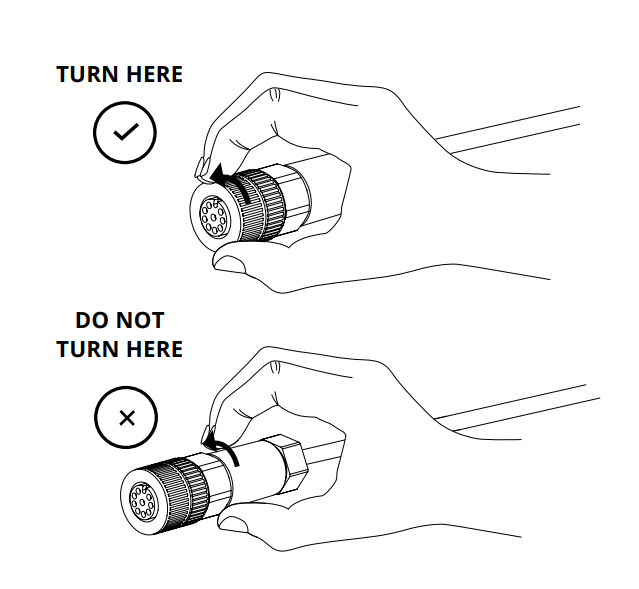
Connect the sensor cable assembly to the mating panel connector on the device. Turn the adjustable stainless-steel end piece to secure the field-attachable connector to the device.
CAUTION: Do not turn the black plastic hood of the connector. Turning the black hood might cause the wires to disconnect, break, and/or damage the connector pins.
-
Mount the camera sensor on a wall, pipe, or other secure mount location by using zip ties or screws.
-
Swipe the magnetic Activator key over the embossed logo on the face of the device. This forced reset expedites the time for the device to connect to the server.
-
In the UI, check the two streams:
-
-
Camera stream - The sensor data shows up in the Samples tab in the Raw Value column of the Camera stream. Look for the following values:
- 1 - an image was captured
- 0 - no image could be taken
- A large negative number, for example –2147, indicates a Modbus error from another issue such as configuration or wiring. For details, see Data samples from the serial sensor show Modbus errors.
-
Image stream - The image files show up in the Samples tab in the Raw Value column of the Image stream. For example, a Raw Value might be czM6Ly0heXIIa2EtYmxvYnMvYmxvYnMvM and its Final Value is 0.
-
4. If needed, adjust the camera position.
Recommended Practices
-
Take frames every 15-30 minutes until you’re sure that the camera is working properly and that its aim and focus are optimal.
- When running on batteries, capturing a frame every 30min is the maximum recommended rate. A higher rate (e.g. 5 minutes) might strain the battery and lead to errors in reading sensors and possibly communication errors. Capturing a frame consumes more energy compared to traditional sensors. To conserve battery, you can take frames only when there is an event.
- When running on external power, you can capture a frame as fast as once every 10 minutes.
- Consider the device's internal storage capabilities and transmission interval when choosing the frame rate. Every captured frame is stored on the device's internal memory. This memory is only free upon successful transmission. Wavelet V2™ devices can hold days of data without transmission (not recommended, but possible). Wavelet 4R™ can hold tens of images (depending on the size and compression ratio). Once the memory is full, no new data will be captured.
- The longer the interval between transmissions, the longer each transmission takes. This is because there is more data to send in each transmission cycle. This also has implications for power consumption. Try to avoid long transmissions when running on batteries.
-
If you need to change the default camera configuration, follow the steps in the "manually configure the serial stream" section.
-
You can adjust the JPEG compression level and buffer size to optimize battery consumption by modifying the extra_param flags.