Wavelet Ex™ is potted, so its SIM cannot be replaced.
Wavelet 4R™ has one SIM card.
Wavelet V2™ and Wavelet 4™ have two SIM cards. SIM1 is the main communication card. Typically, SIM2 is the backup card that is used if communication fails in SIM1. In this procedure, we will replace SIM1. The preferred method to configure the new SIM is through the UI. Alternatively, you can use AK commands.
Contents
Use AK commands
Prerequisites
- You must have a torque screwdriver.
- You must have a Micro-USB cable and a laptop.
- Ensure that the Micro-USB cable is functioning correctly by testing connectivity between another device (not a Wavelet) and your laptop.
- Download PuTTY terminal emulation software to the laptop. If the SIM replacement is unsuccessful, Support will need to access the device.
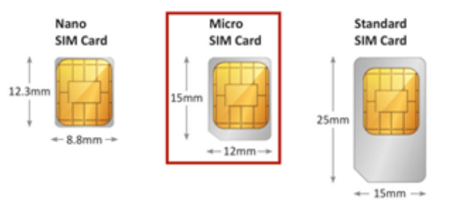
- The device uses a Micro-SIM card (3FF Sim Card). Ensure that you use an appropriately sized SIM card.
- Write down (or photograph) the new SIM’s PIN and PUK numbers, the new SIM’s APN address, and the device’s serial device number.
- Initially, the device must be turned on. If the device is in hibernation mode, swipe the magnetic Activator key over the embossed logo on the face of the device until the LED lights flash.
Replacement steps
Tip: Steps 1 and 3 below can be done in the AyyekaGo mobile app instead of the UI. The settings that need to be changed are in the Cellular Settings page.
- Send a command to remotely change the SIM card’s APN address. Do the following steps:
a. Click Devices in the left pane.
b. In the Sites Tree pane, select the device whose SIM you are replacing.
c. Click the Configuration tab on the right pane.
d. Expand the ADVANCED DEVICE CONFIGURATION tree, and then select GSM.
e. Click the gsm_apn parameter in the tree. (If you need to change SIM2, edit gsm_apn_sim2).
f. Click Set Setting to change the value to the APN of the new SIM.
As an example, suppose that the current APN is internetm2m.air.com. The new APN will be sim1.apn.com.
A change-gsm-apn command will be generated, and the device will receive and execute the command at the next transmission.
2. (Optional) Type in a username and password for the SIM card by editing the value of gsm_apn_user and gsm_apn_pass. (If you want to change SIM2, edit gsm_apn_sim2 and gsm_apn_pass_sim2.)
3. In the Configuration tab, click the green box in the TRANSMISSION INTERVAL pane to open the Select Transmission Interval window.
4. Change the Transmission Interval to 10 minutes by moving the slider to 10 min, and then clicking Submit.
5. Under the device picture at the top of the screen, click Actions, and then select Reboot.
6. In the Commands tab, verify that the commands “Set Reporting Interval”, “Set General Setting”, and “Reboot” that were sent thus far have been received. Wait until all three commands’ Status is 100% before proceeding.
7. In the Configuration tab, check that the new APN was accepted. Repeat steps 1c and 1d. You should see the former APN and the new APN listed.
2. Steps in the Device
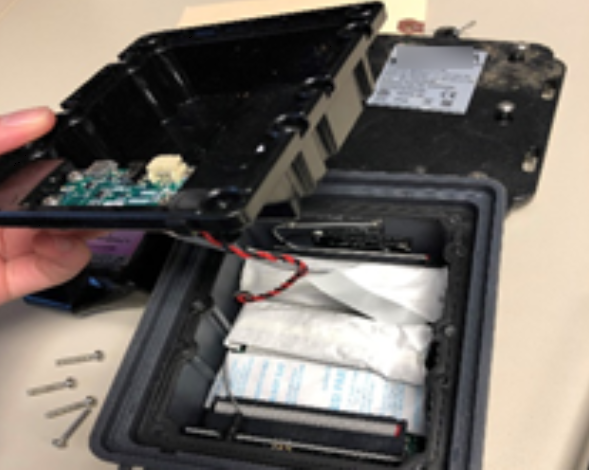
- Partially unscrew the six (6) screws located on the back of the device enclosure, until you can lift off the back panel with the screws still affixed to their screw holes.
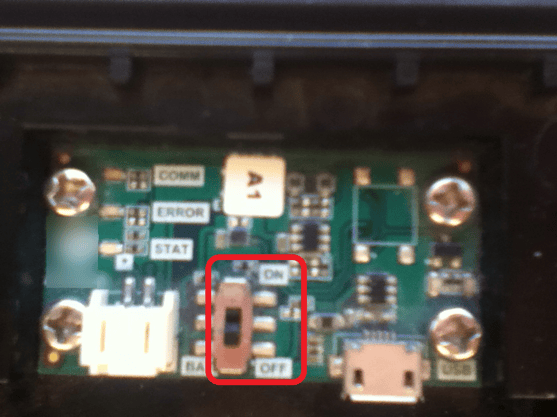
Note: To prevent damage to the screws, it is recommended to begin by loosening them manually before using an electric screwdriver. - On the interface board, power off the device by moving the ON/OFF switch to the OFF position.
3. Disconnect the battery cable from the interface board.
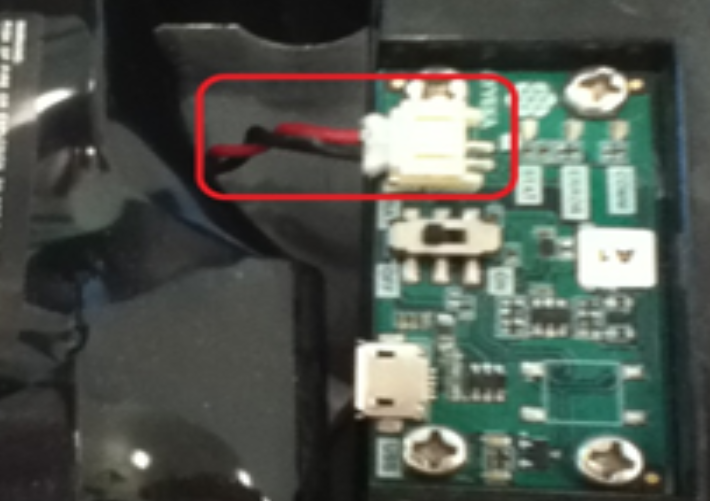
Failure to do steps 2 and 3 might cause a short circuit in the device.
4. Remove the four internal screws, and then pull up the plastic casing.
Warning: Do not remove the rubber gasket that sits inside the rim of the back panel. The gasket is thin and not glued to the back panel.
5. Unplug the red and black wires from the underside of the plastic casing to allow easier access to the SIM card. Set the casing to the side.
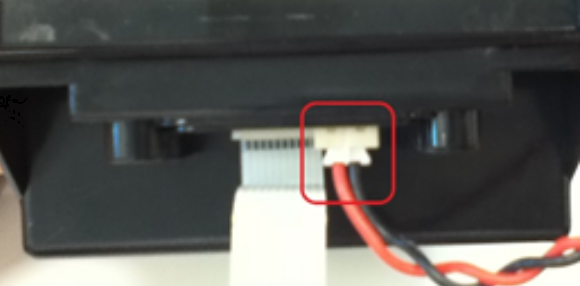
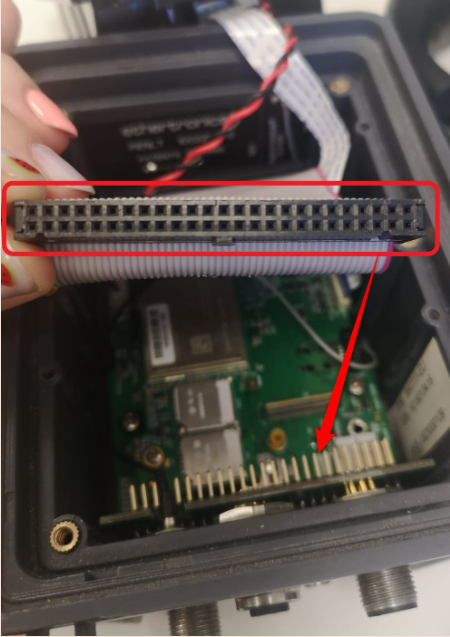
6. Unplug the flat cable.
Note: These pictures are for the Wavelet V2™

The following picture shows the inside of a device after the flat cable is unplugged.
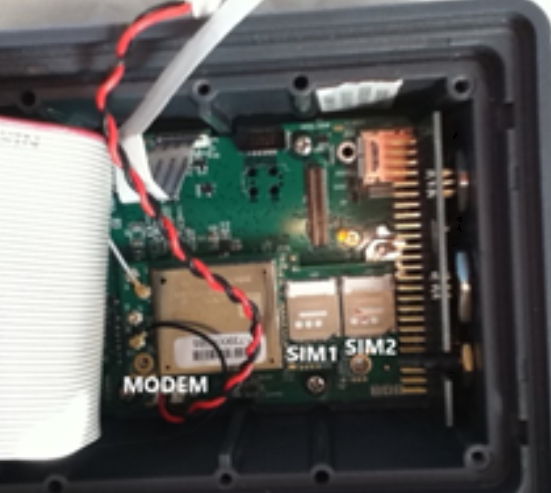
Note: This picture is for the Wavelet 4R™

7. On the SIM1 card tray holder, note the Lock ![]() and Unlock
and Unlock ![]() . Slide the cover that is over the SIM1 card toward the Unlock direction. The cover will pop open.
. Slide the cover that is over the SIM1 card toward the Unlock direction. The cover will pop open.
8. Remove the original SIM1 card and put in the new one. Slide the tray holder cover toward the Lock direction to lock SIM1. The cover will snap closed.
9. Reconnect all wiring. Put the desiccants back into the compartment. Put the plastic casing back into place. Screw the four internal screws back in.
Important: Ensure that the rubber gasket is in place in the back panel. The gasket prevents water from entering the device.
If the gasket is missing, Ayyeka considers any subsequent water and/or dust damage to be the result of faulty use and/or maintenance. Those repairs will not be covered by the user's service contract.
Note: To avoid damaging the screws, it is recommended not to apply excessive force.

Note: Do not turn the device on yet.
3.Steps in the UI
- In the Configuration tab on the right, expand the ADVANCED DEVICE CONFIGURATION tree, and select the GSM
- Click gsm_done_onetime_setup parameter in the tree.
- Click the value, and then select Set Setting. Change the value to 0.
- Turn the device back on.
- In the Commands tab, wait for the command Set General Setting to reach Status of 100%.
- Turn the device off.
- In the Configuration tab, click the green box in the TRANSMISSION INTERVAL pane. Change the Transmission Interval back to 1 hour by moving the slider to 1h, and then clicking Submit.
- Under the device picture at the top of the screen, click Actions, and then select Hibernate.
- Turn the device back on.
- In the Commands tab, wait for both commands to reach Status of 100%. The SIM card replacement process is complete.
Post-replacement steps
- Replace the back panel and tighten the six screws with a torque of 4.5 Nm. Do not over-tighten because this will strip the screw threads.
- Wait 5-10 minutes for the device to perform a calibration process, and then to start transmitting to the cloud server.
- In the UI, check whether the device is transmitting.
-
- If the device is transmitting, the SIM was successfully replaced. No further action is needed.
- If the device is not transmitting, contact Support. They will ask you to send a device trace or to use AK commands.
Create a Device Trace
Do the following steps:
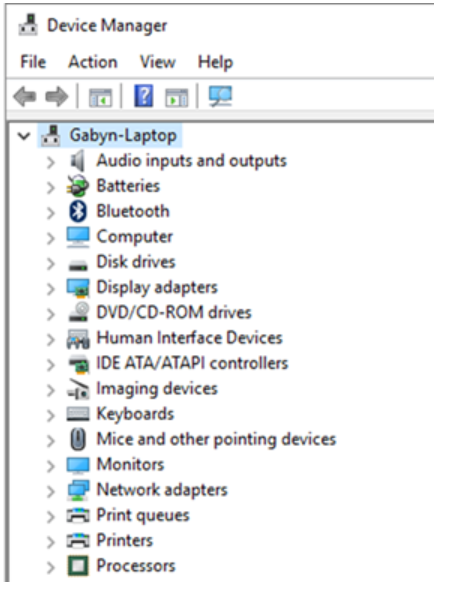
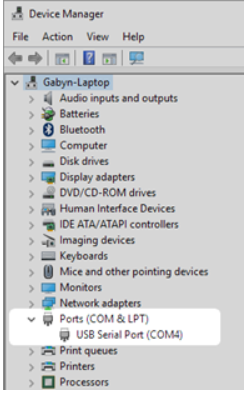
- On your laptop, open the Device Manager and check if any Ports (COM & LPT) exist. This section might be missing, as shown below, if no ports are connected.
2. Discover the COM port of the device by doing the following steps:
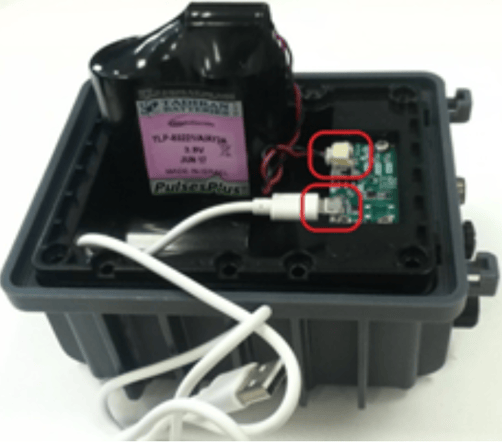
a. Open the device, and then stand the battery on its side to expose the USB port. Do not disconnect the battery from the interface board.
b. Use the Micro-USB cable to connect the device’s interface board and to your laptop.
At the USB port side in the device, be careful that the cable does not pull up. Upward tension on the USB port might disconnect the port from the device’s interface board.
c. Wait for the Windows Plug & Play Drivers to be installed on your laptop. For any driver problems, see FTDI Chip Installation Guides.
d. Refresh the Device Manager. The Ports (COM & LPT) should now appear. The COM port appearing in the USB Serial Port line is the device’s COM port.
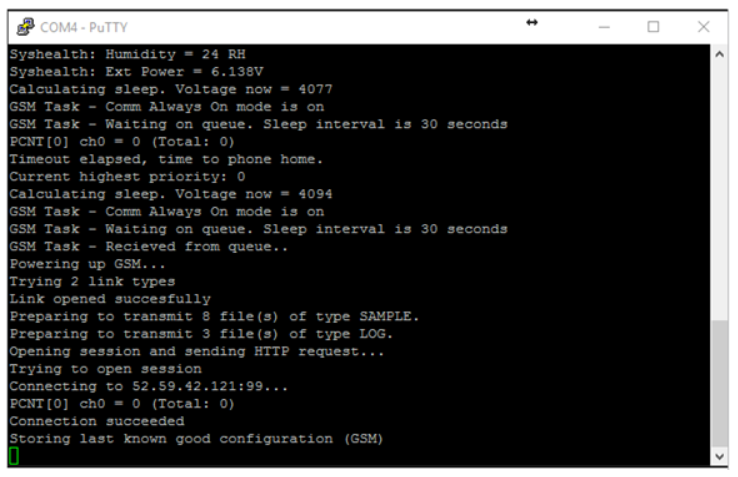
3. Right-click putty.exe to open a PuTTY terminal, and then click Run as administrator.
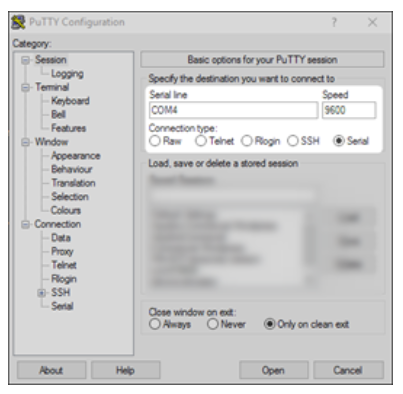
4. Configure the following parameters:
-
- Connection type – Serial
- Serial line – The COM port that was added after Micro-USB connection
- Speed – 9600 Baud per second
6. Contact Support to enable a remote session of your laptop.
Use AK commands
If the SIM card was misconfigured in the UI so that there is no longer any communication with UI, AK commands can correct the configuration. AK commands communicate directly with the device rather than going through UI.
Caution:
Misuse of some AK commands might render the device unusable. For this reason, typically only Partners and anyone doing remote integration with the devices use AK commands.
Do the following steps:
- Follow the steps to Create a Device Trace.
- Notify Support that the device is connected so that Support can confirm. AK Commands in the following table can now be entered at the command prompt.
|
Description |
Command |
|
GSM APN |
cmd ak3.CMD_SETTING_SET 0 0x1 1 8 1 0 0 7 7 "APN_for_SIM1" |
|
GSM APN User |
cmd ak3.CMD_SETTING_SET 0 0x1 1 9 1 0 0 7 7 "SIM1_user_name" |
|
GSM APN Pass |
cmd ak3.CMD_SETTING_SET 0 0x1 1 10 1 0 0 7 7 "SIM1_password" |
|
One Time Init |
cmd 4 0 0x1 1 7 1 0 0 0 0 0 |
Note: If you need to replace SIM2, use the following commands:
|
Description |
Command |
|
GSM APN SIM2 |
cmd ak3.CMD_SETTING_SET 0 0x1 1 50 1 0 0 7 7 "APN_for_SIM2" |
|
GSM APN User SIM2 |
cmd ak3.CMD_SETTING_SET 0 0x1 1 51 1 0 0 0 0 "SIM2_user_name" |
|
GSM APN Pass SIM2 |
cmd ak3.CMD_SETTING_SET 0 0x1 1 52 1 0 0 0 0 "SIM2_password" |
|
One Time Init |
cmd 4 0 0x1 1 7 1 0 0 0 0 0 |